The Software Updates for ConfigMgr page in Right Click Tools Patching displays information about processes set up to deploy third-party application updates via Configuration Manager's software updates management functionality. From this page, you can add a new software update process and edit or delete software update processes.

Software update information:
- Software update process name
- Environment: The Configuration Manager environment targeted by the process.
- Applications: Number of applications in the software update process. Click the number to view and manage the applications.
- Date Processed
- Status of the software update process:
- Successful - The application was imported successfully into Configuration Manager.
- Running - The application import is in progress.
- Pending run - A new software updates process that has not started. To start the process, click the ellipsis (...) in the Actions column and click Run.
- Warning - The application was imported into Configuration Manager, but Patching wasn't able to create the software update process.
- Error - The application import failed and requires troubleshooting. Hover over the Error icon for details.
Possible reasons for an error:
- You attempt to choose an environment that does not currently support software update processes, such as an Intune environment.
- You select third-party applications that are not supported in WSUS. An upcoming Right Click Tools Patching release will disable applications that are incompatible with WSUS so that they aren't selectable. You can continue to update these applications using a deployment process.
- Actions
- Edit software update process details including the environment and the applications included.
- Click the ellipsis (...) to Run or Delete the software update process. A deletion cannot be undone.
Each Right Click Tools Patching software update process defines one or more third-party applications to patch using Configuration Manager's software update management. You can view and edit all your software update processes on the Software Updates for ConfigMgr page in your Recast Management Server.
NOTE: For this initial iteration of the software updates feature, all devices will update to the most recent application version. This means, for example, that all devices that have WinZip 9 or WinZip 10 installed will update to the latest WinZip 10 version. An upcoming release of Right Click Tools Patching will add the ability to configure a patching process level that restricts updates within a major version for a specified device collection.
Prerequisites
- Right Click Tools Patching Enterprise license
- Recast Software Version 5.11.2509.1603 or later installed
- Service connection from your Recast Management Server to Configuration Manager
- Windows Server Update Services (WSUS) set up in your Configuration Manager environment
- WSUS Signing Certificate:
- For a ConfigMgr-managed certificate, the certificate is added to the Trusted Publishers certificate store where the Recast Proxy is installed
- For a self-signed certificate, the certificate is added to the Trusted Root Certification Authorities and Trusted Publishers certificate stores where the Recast Proxy is installed
- Recast Proxy service account permissions:
- The service account is a member of the WSUS Administrators on the server where WSUS connected to ConfigMgr is located
- The service account is a member of the local Administrators group on the WSUS server or the required proxy permissions are granted individually
- Recast Proxy server has the RSAT Windows Server Update Services Tools feature installed
PowerShell command to install RSAT feature: Install-WindowsFeature -Name UpdateServices-RSAT -IncludeAllSubFeature
NOTE: Restart the Recast Proxy service after executing the command.
- Devices with applications to update have an older version installed
Create a New Software Update Process
To create a new software update process:
1. In your Recast Management Server, navigate to Patching > Software Updates for ConfigMgr.
2. On the Software updates for ConfigMgr page, click Add Software update.

3. In the Select Environment side panel that opens, choose a Configuration Manager environment that is listed as 'Ready'. Click Next.
4. Search for and select the applications to deploy with this software updates process. Click Next.
5. Name the software update process.
6. Choose whether to start importing updates to WSUS immediately or start the software update process manually when ready.
7. Click Save & Close to return to the Software updates for ConfigMgr page.
NOTE: A service connection Discovery Sync must run before software updates will appear in Configuration Manager. If you'd prefer not to wait for the scheduled task, you can manually initiate data synchronization.
Synchronize Software Updates to Configuration Manager
To synchronize the update to ConfigMgr:
1. In your Configuration Manager console, navigate to Software Library > Overview > Software Updates > All Software Updates.
2. Click Synchronize Software Updates and confirm your choice.
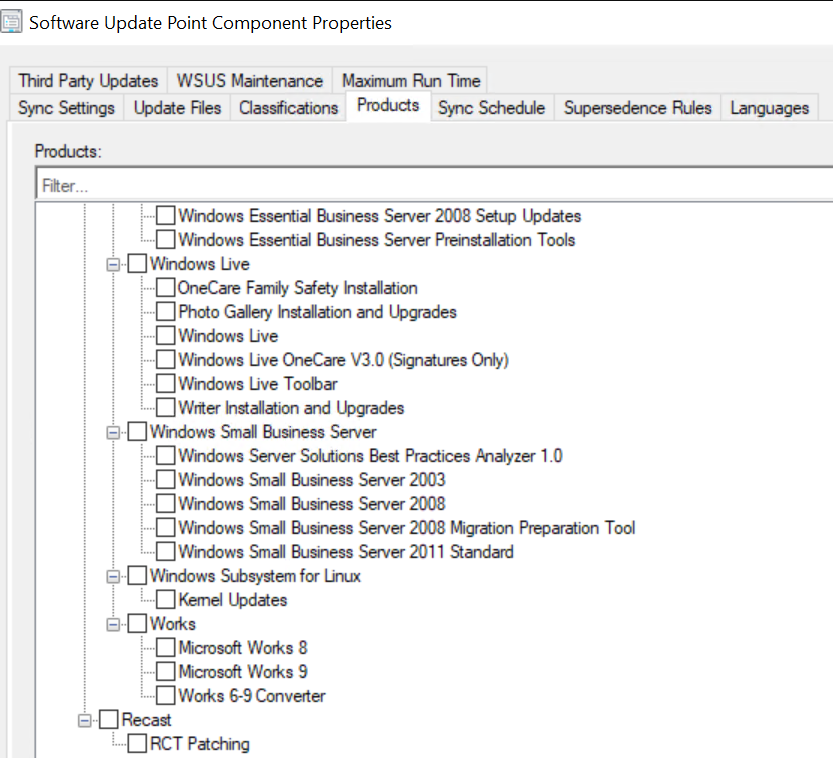
3. After the initial sync completes, go to the Software Update Point Component Properties page. On the Products tab, add Recast as the publisher name and RCT Patching as the product name.
Required action: The October 2025 Recast release updates the product name from Application Manager to RCT Patching. Customers who deployed the initial September 2025 version with Application Manager as the product name must update to RCT Patching on the Software Update Point Component Properties page to ensure that new application updates appear automatically in the ConfigMgr Software Update service. If you selected Recast as the publisher (rather than Application Manager as the product) when manually deploying software updates or creating ADRs using the September 2025 release, no action is required.
After software updates are successfully synchronized, the applications in your Patching software update process will appear on the All Software Updates page in Configuration Manager.
Deploy Software Updates to a Device Collection
You can deploy the software updates to devices manually or automatically using new or existing automatic deployment rules (ADRs). Deployed updates will then appear in the Software Center, ready to install.
A note about old Software Update version cleanup: A future RCT Patching release will add cleanup capabilities for old software update versions. For now, to prevent WSUS database storage issues, we recommend configuring WSUS cleanup capabilities within the ConfigMgr Software Update service.
To run software update processes via ConfigMgr's software updates management, the proxy service account must be a member of the local WSUS Administrators group and the local Administrator's group. To work around security policies that prevent you from adding users to the local Administrator's group, you can give the service account full control over specific items necessary for package publishing.
You must grant the proxy service account access to the RCT Patching content folder. After that, you'll need to give the service account the required Registry permissions and Component Services permissions.
Grant Access to the Patching Content Folder
You'll need to grant MODIFY permissions to the Recast Proxy service account for the Right Click Tools Patching content folder. This is the folder defined on the Environment Settings page's General > Advanced tab as the UNC Path.
Edit Windows Registry Permissions
To edit Windows Registry permissions:
1. Open the Windows Registry Editor on the WSUS server.
2. Right-click on the HKLM\Software\Classes\AppID\{8F5D3447-9CCE-455C-BAEF-55D42420143B} key and select Permissions from the drop-down menu.
3. On the Security tab, click Advanced.
4. In the Advanced Security Settings, change the registry key Owner to the admin user (the user logged in as when doing this change) or admin group.
5. For SYSTEM and Administrators, change Access to 'Full Control'.

6. Click OK to apply your changes.
Edit Component Services Permissions
To edit DCOM permissions:
1. Start the dcomcnfg.exe as an admin.
2. Navigate to Component Services > Computers > My Computer > DCOM Config.
3. Locate the WSusCertServer. Right-click and choose Properties.
4. On the Security tab, set all Permissions to Customize.
NOTE: Configuration Permissions should be set to Customize by default.
5. Edit the Launch and Activation Permissions by adding the Recast Proxy service account (user) and setting all permissions to Allow (Local Launch, Remote Launch, Local Activation, Remote Activation).
6. Edit the Access Permissions by adding the Recast Proxy service account (user) and setting all permissions to Allow (Local Access, Remote Access).
7. Restart the WSusCertServer service.
TIP: After editing the DCOM Config permissions, you can optionally revert registry key ownership to the default owner, NT Service\TrustedInstaller.
By default, superseded software updates deployed using a Software Updates for ConfigMgr process are set to expire after 6 months. You can remove superseded updates from the WSUS UpdateServicesPackages and WSUSContent folders sooner by reducing the number of months before those updates expire. We recommend that you then synchronize all software updates.
Set Software Update Expiry
To edit the amount of time before a superseded software update expires:
1. In your Configuration Manager console, navigate to Software Library > Overview > Software Updates > All Software Updates.
2. On the Software Update Point Component Properties page, select the Supersedence Rules tab.
3. Under Supersedence behavior of updates other than feature updates, reduce the number of Months to wait before a superseded software update is expired to fewer than the default 6 months.
3. On the WSUS Maintenance tab, enable Decline expired updates in WSUS according to supersedence rules.
To learn more, see Decline superseded updates in the WSUS maintenance guide for ConfigMgr | Microsoft Learn.
Synchronize Software Updates
Once you've set Software Updates (SU) options above, we recommend running Synchronize Software Updates. The sync ensures that all Software Update catalogs are up to date. It will also clean up declined software updates.
TIP: If it has been a while since any cleanup process has occurred, run the cleanup wizard several times until it completes without errors or timing out.
For more details, see Run the WSUS Server Cleanup Wizard in the WSUS maintenance guide for ConfigMgr | Microsoft Learn.
