To view or edit the permissions associated with a Recast role:
1. Under Recast Roles, click Permissions to the right of the role.

2. In the Role Permissions window that opens, expand categories to view or edit individual permissions.

See Custom Role Templates for Right Click Tools for a complete list of permissions granted by Read Only, Remote Software Center, and Content Distribution Monitor Dashboard roles.
You can grant an Active Directory user or user group Recast permissions by assigning a specific role, such as an Administrator role. Right Click Tools Enterprise must be connected to a Recast Management Server to set up role-based permissions.
ROLE NOTES:
- When a user is assigned multiple roles, their permissions for each role are aggregated
- A user's role is also constrained by any user or group limiting rules that are applied
Add an Active Directory User or User Group in RMS
To add an AD user or user group:
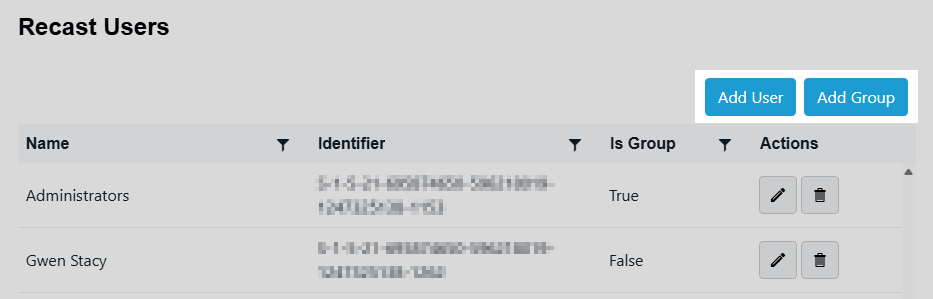
1. In your Recast Management Server, navigate to Administration > Permissions.
2. In the Recast Users section, click Add User or Add Group.
3. In the window that opens, search for your AD name or AD user group and click the Add button.
- Search is limited to the users or groups in the same domain as your Recast Management Server.
- Search looks to match the user logon name (SamAccountName) not the display name.
Use a wildcard (*) to facilitate your search
Wildcard examples:John Connor returns strings that match exactly
John C* returns strings beginning with 'John C', such as 'John Connor', 'John Connors', and 'John Cranston'
*Connor returns strings ending with 'Connor', such as 'John Connor' and 'Carol O'Connor'
*Support* returns strings that include 'Support' plus whatever is on the left and right, such as 'Customer Support Team' and 'Enterprise Support Group'
Assign a User or Group a Role
Each user or user group must be assigned at least one role.
To assign a user a role:
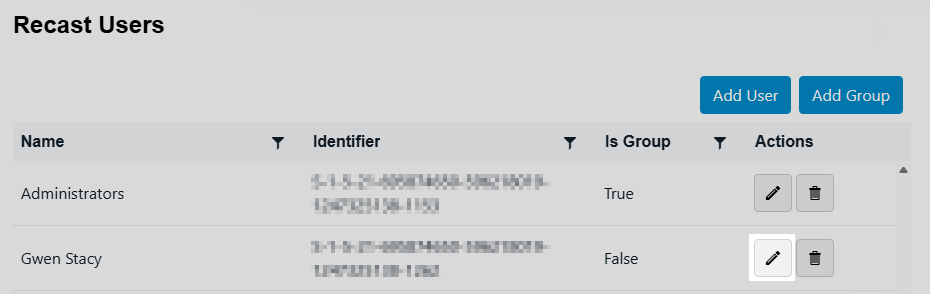
1. On the Permissions page, click the Edit icon to the right of the user or group.
2. In the Role Assignments window that opens, under Roles, select a role to assign to the user/group.
To learn about the individual permissions granted by a role, see View or Edit User Role Permissions.
3. Under Assigned Roles, enable Limit this user to specific objects and select a Service Connection to add a limiting rule that restricts user permissions to a set of devices (optional). To learn more, see Limiting Rules.

4. Click Save.
NOTE: Beginning with Recast Software Version 5.9.2502.2105, you no longer have to set a Refresh Interval to repopulate your limiting rules (formerly known as scopes). The scheduled Discovery Sync will keep your service connection data up to date.
Custom role templates offer a quick way to create permission sets for Right Click Tools users. You can find three custom role templates in your Recast Management Server and then adjust to suit by adding or removing individual permissions.
Available custom role templates:
- Read Only - This security role grants users read access to all of the Right Click Tools and web dashboards. This includes the Right Click Tools Insights Report Viewer role.
For the complete list of permissions granted with this role, see Read-Only Analyst Role Permissions.
- Remote Software Center - This security role grants users access to all the actions within the Right Click Tools Remote Software Center.
For the complete list of permissions granted with this role, see Remote Software Center Role Permissions.
- Content Distribution Monitor Dashboard - This security role grants users access to all the actions within the Right Click Tools Content Distribution Monitor (for Configuration Manager).
For the complete list of permissions granted with this role, see Content Distribution Monitor Dashboard Role Permissions.
 TIP: You can view or edit the permissions granted by a role by clicking the Permissions button.
To assign a custom role to a user or user group:
1. On the RMS Permissions page, click the Edit icon to the right of a user/user group.
2. Under Role Assignments, select Read Only, Remote Software Center, or Content Distribution Monitor Dashboard.
3. Under Assigned Roles, enable Limit this user to specific objects and select a Service Connection to add a limiting rule that restricts user permissions to a set of devices (optional). To learn more, see Limiting Rules.
4. Click Save.
Limiting rules are automatically added in the background when a route is created or when a user or user group is assigned a role granting permissions that only allow them to perform tasks within the defined limits, which may narrow permissions to certain devices, users, AD OUs, or AD groups.
User/Group Limiting Rule - Limits a user or group to running actions against a specified subset of users or devices
Route Limiting Rule - Runs actions over a specified Recast Proxy or Fast Channel route only if the target devices are within the bounds of the limiting rule
To better understand why and how to use limiting rules, watch Marty Miller's Limiting Rules in Recast Management Server video on the Recast Software YouTube channel.
A user or user group limiting rule (previously known as a scope) restricts a user or user group to running actions against a specified subset of users or devices. This type of limiting rule can be used, for example, to give a Help Desk group permission to run actions against only workstation devices.
You can limit a user/group to running actions against one or more of the following:
- Active Directory - domain, OU, group
- Configuration Manager - site, device collection, user collection, user group
Add or Edit a User or User Group Limiting Rule
To add or edit a limiting rule for an existing user or group:
1. On the Permissions page, under Recast Users, click the Edit icon to the right of the user or group.
2. In the Role Assignments window that opens, under Assigned Roles, select a role.
3. Enable the Limit this user to specific objects option.
4. Choose a Configuration Manager or Active Directory Service Connection.
5. Select the objects against which the user or group can run actions. For example, you can choose specific Configuration Manager collections and/or Active Directory OUs.
NOTE: You must apply the limiting rule separately for each service connection.
6. Click Save.
User/Group Limiting Rule Notes
- A limiting rule that creates a subset of users will not impact actions related to devices.
- A limiting rule that creates a subset of devices will not impact actions related to users.
- If a user or group is included in multiple user/group limiting rules, the user's/group's limiting rules will be an aggregate of all the applied limiting rules.
- If multiple limiting rules are set for a user or group, only one limiting rule needs to be true in order for the validation to pass. For example, if a user is in the limiting rule group, limiting rules applied to the group will also apply to the user.
- Recast Builder actions are permissioned separately. If an action is a Device Action Type or User Action Type, the device or user value must pass validation. If the action is a Generic Action Type, it will remain without a limiting rule.
Remove a User or User Group Limiting Rule
To remove a user or group limiting rule:
1. On the Permissions page, click the Edit icon to the right of the user.
2. Under Assigned Roles, select a role.
3. Disable the Limit this user to specific objects option.
4. Click Save.
A route limiting rule (previously known as a route scope) allows actions to be run over a specified route only if the target devices are within the defined limits. Adding a route limiting rule can be especially helpful where the environment includes multiple domains with varying trust levels.
You can limit a Recast Proxy Route to devices in one or more of the following:
- Active Directory - domain, OU, group
- Configuration Manager - site, device collection
Add or Edit a Route Limiting Rule
To add or edit a limiting rule applied to an existing route:
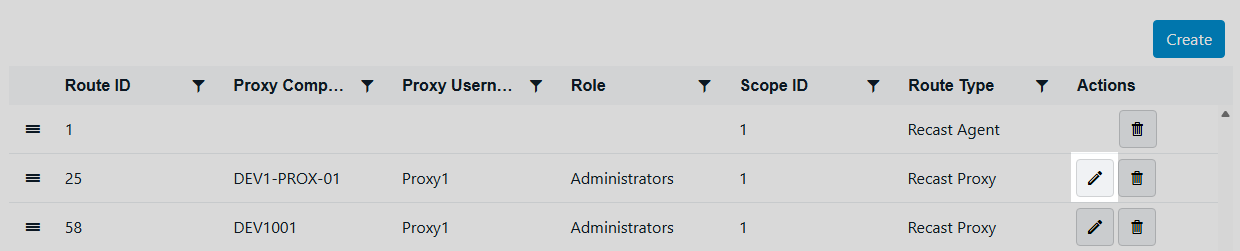
1. On the Routes page, click the Edit icon to the right of the route.
2. In the Edit Route window that opens, enable the Limit to devices option.
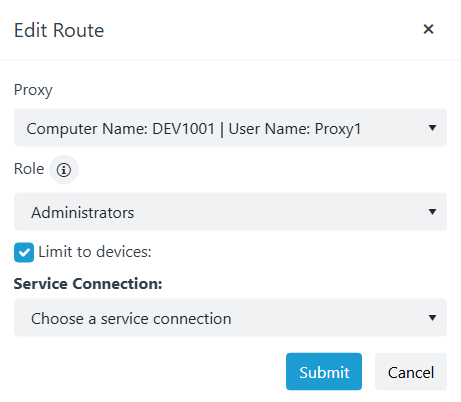
3. Select a Configuration Manager or Active Directory Service Connection.
4. Select the devices to include.
NOTE: You must apply the limiting rule separately for each service connection.
5. Click Submit.
Route Limiting Rule Notes
Fast Channel Route
- You must configure a limiting rule for a Fast Channel route.
- You can only apply a limiting rule to a ConfigMgr service connection.
- You cannot apply multiple limiting rules concurrently.
- You can only run actions on devices that are Fast Channel-capable, meaning that Recast Agents are deployed to the devices.
Proxy Route
- Limiting rules set up for the proxy account user apply.
- If a device is included in multiple proxy route limiting rules, the device's limiting rules will be an aggregate of all the applied limiting rules.
Remove a Route Limiting Rule
To remove a route limiting rule:
1. On the Routes page, click the Edit icon to the right of the route.
2. In the Edit Route window, disable the Limit to devices option.
3. Click Submit.
