The Remote Registry service is used by many Right Click Tools to pull information about a particular device. To enable Remote Registry, you'll need to start the service and create a new rule to allow it through the firewall.
NOTE: When configuring your clients to work with Right Click Tools Enterprise, Remote WMI must also be enabled. ICMP Echo can optionally be enabled to speed up actions for computers that are offline.
Looking to use Remote Registry with Entra-only devices?
See Fabian Rodriguez's blog posts to set up Public Key Peer-to-Peer Authentication for Entra-joined devices and Enable File Sharing for Entra-Joined Devices.
Start the Remote Registry Service
To start the service:
1. Open the Group Policy Management Console and create a new Group Policy Object.
2. Edit the new Group Policy Object and go to Computer Configuration > Preferences > Control Panel Settings > Services.
3. Create a new service.
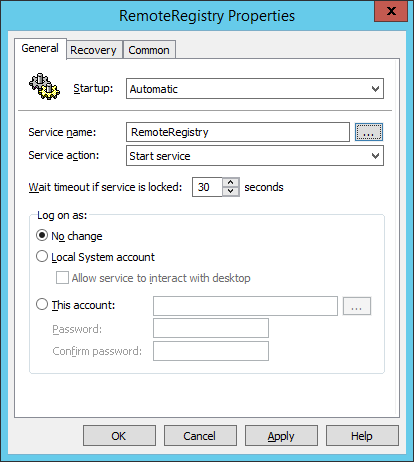
4. Change the Startup type to Automatic.
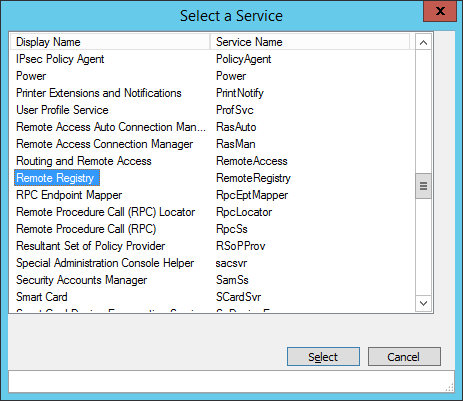
5. In the Service name field, browse to Remote Registry.
6. Under Service action, select Start service. Click OK.
7. Close the Group Policy Management Editor.
Create a Firewall Rule for Remote Registry
By default, Remote Registry is not allowed through the Windows firewall. This can easily be enabled with Group Policy.
To create a new firewall rule:
1. Create or edit an existing Group Policy Object.
2. Navigate to Computer Configuration > Policies - Security Settings > Windows Firewall with Advanced Security > Windows Firewall with Advanced Security.
3. Right-click on Inbound Rules and choose New Rule.
4. In the New Inbound Rule Wizard, choose Port.
5. On the Protocols and Ports page, choose TCP and Specific Local Ports. Enter 445 as the local port. 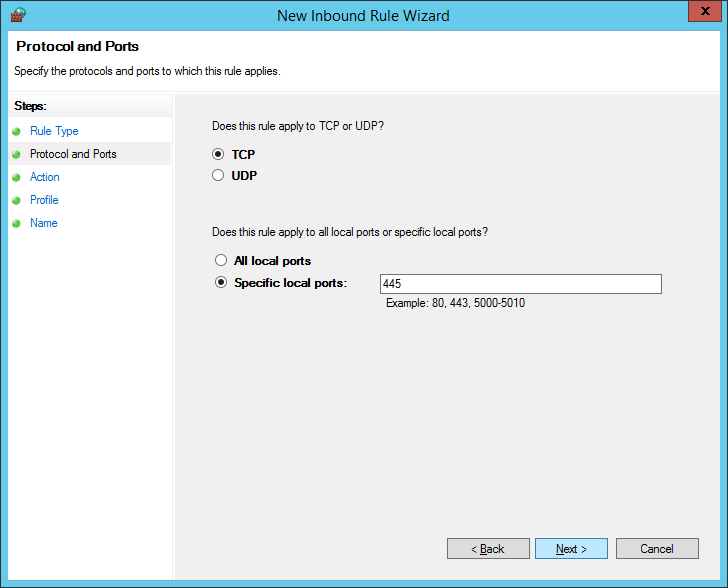
6. On the Action page, choose Allow the connection.
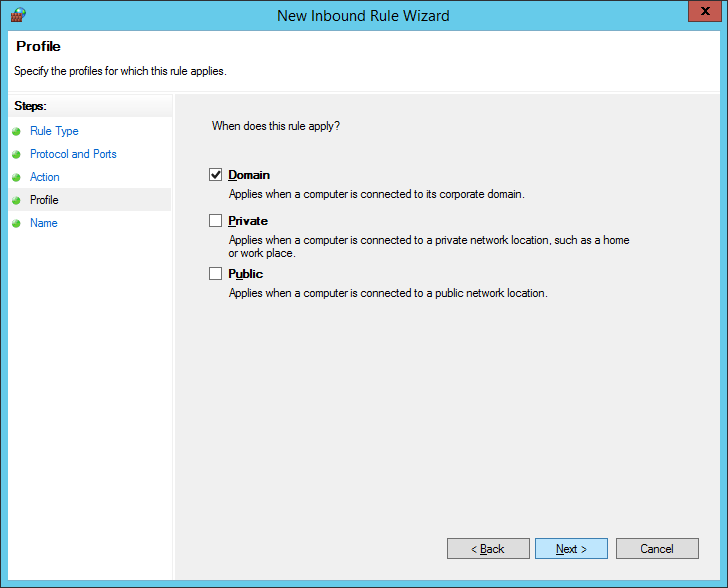
7. On the Profile page, choose the firewall profiles to which the rule will apply. You should select at least the Domain level.
8. Give the new firewall rule a descriptive name and click Finish to exit the New Inbound Rule Wizard.
Many Right Click Tools use Remote Windows Management Instrumentation (WMI) to gather information and perform Configuration Manager client actions on devices.
NOTE: When configuring your clients to work with Right Click Tools Enterprise, Remote Registry must also be enabled. ICMP Echo can optionally be enabled to speed up actions for computers that are offline.
Looking to use Remote WMI actions on Entra-only devices?
See Fabian Rodriguez's blog post on Unlocking Remote WMI for Entra Devices in Windows 11 25H2.
Create a Firewall Rule for Remote WMI
WMI is not allowed through the Windows firewall by default, but can be enabled with a Group Policy rule.
To create a new firewall rule:
1. Open the Group Policy Management Console and create a new Group Policy Object.
2. Navigate to Computer Configuration > Policies > Security Settings > Windows Firewall with Advanced Security > Windows Firewall with Advanced Security.
3. Right-click on Inbound Rules and choose New Rule.
4. On the Rule Type page, choose to create a Predefined rule.
5. Select Windows Management Instrumentation (WMI) from the drop-down menu and click Next.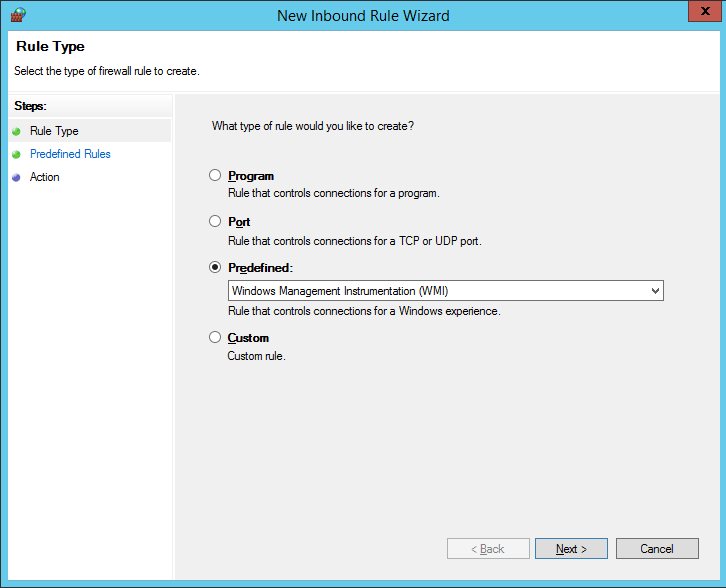
6. On the Predefined Rules page, click Next.
7. On the Action page, choose Allow the connection.
8. Click Finish to exit the New Inbound Rule Wizard.
ICMP Echo is required by many Right Click Tools to detect if a computer is turned on. Since many of the tools use methods that are slow to timeout when a computer is turned off, Right Click Tools sends a ping packet to the computer and skips the device if no reply is received. With Right Click Tools Enterprise, there is an option to disable this feature in the server's Global Settings.
NOTE: ICMP Echo is an optional component for Right Click Tools Enterprise, whereas Remote Registry and Remote WMI are required for many of the tools to work.
Create a Firewall Rule for ICMP Echo
By default, ICMP Echo is not allowed through the Windows firewall. This can easily be enabled with Group Policy.
To create a new firewall rule:
1. Open the Group Policy Management Console and create a new Group Policy Object.
2. Navigate to Computer Configuration > Policies > Security Settings > Windows Firewall with Advanced Security > Windows Firewall with Advanced Security.
3. Right-click on Inbound Rules and choose New Rule.
4. On the Rule Type page, choose to create a Custom rule and click Next.
5. On the Program page, choose All programs and click Next.
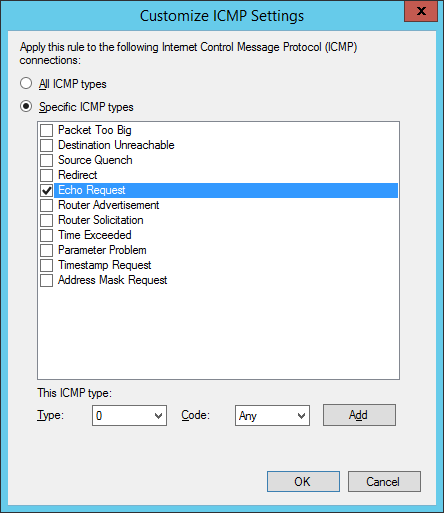
6. On the Protocols and Ports page, choose a Protocol type of ICMPv4. Click Customize.

7. On the Customize ICMP Settings page, select Specific ICMP types and Echo Request. Click OK and then Next on the Protocols and Ports page.
8. On the Scope page, choose Any IP address for both the local and remote IP addresses. Click Next.
9. On the Action page, choose Allow the connection. Click Next.
10. On the Profile page, choose the firewall profiles to which the rule will apply. At a minimum, select the Domain level. Click Next.
11. Give the new firewall rule a descriptive name and click Finish to exit the New Inbound Rule Wizard.
Configuring your Recast tools to query the ConfigMgr SQL database directly for some actions can speed up actions and help with WMI quota violations. Configuring your tools to access your MBAM Recovery and Hardware database to query RecoveryKey IDs will help with the MBAM Dashboards and with the Security Tools management of BitLocker keys. These SQL options offer enhanced performance for larger environments and large datasets.
The method you'll follow for SQL configuration depends on whether you're using Right Click Tools Enterprise with Recast Management Server or in Standalone mode.
Right Click Tools with Recast Management Server
ConfigMgr and MBAM databases are automatically detected during Recast Management Server installation. You can also add or edit database details on the Service Connections page in your Recast Management Server. See Service Connections.
Right Click Tools Standalone
If you are running Right Click Tools in Standalone mode, you'll need to enter SQL and MBAM database information in the Configure Recast Console Extension application.
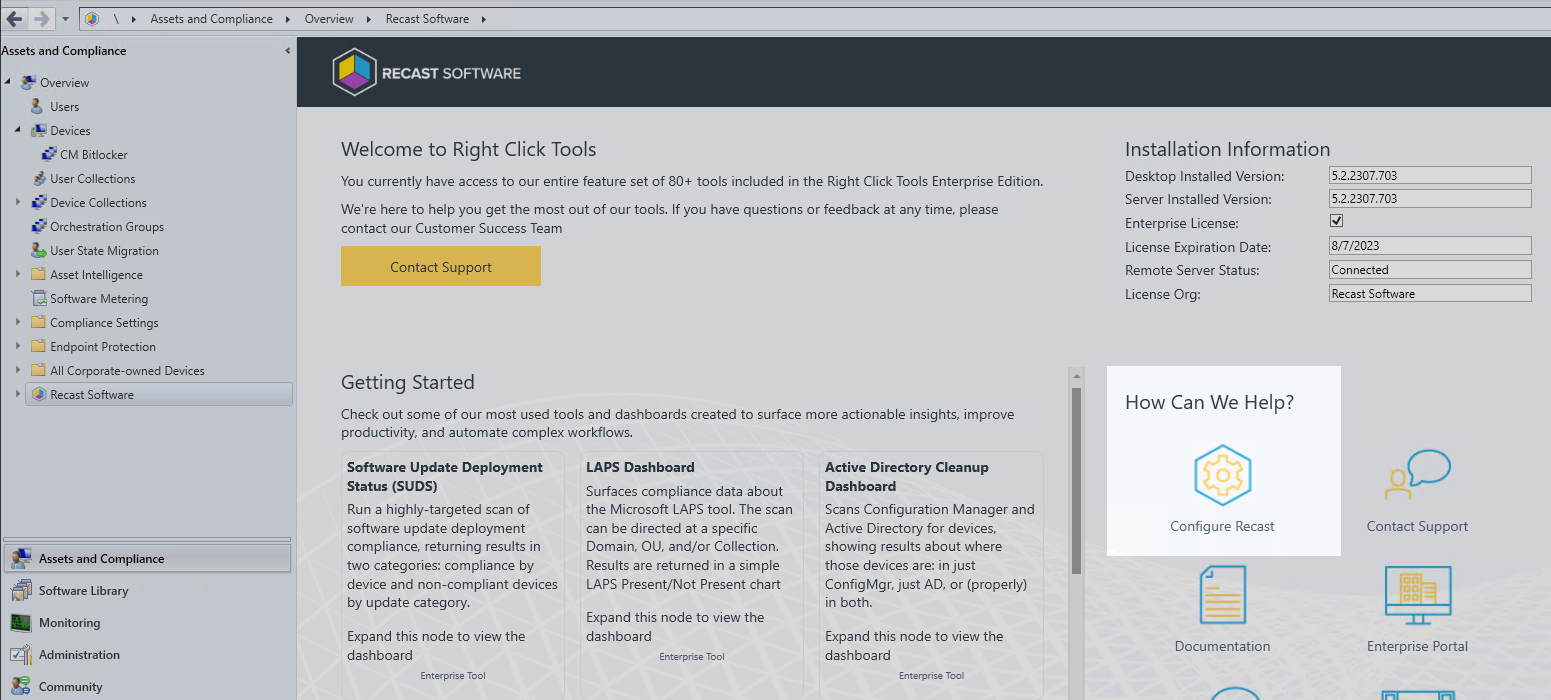
To open the Configure Recast Console Extension application, open the Windows Start menu and select Configure Recast Console Extension.
TIP: You can also access the Configure Recast Console Extension application from your Configuration Manager console by navigating to Assets and Compliance > Recast Software and clicking Configure Recast in the 'How Can We Help?' section.
To enter SQL and MBAM database information for Right Click Tools Standalone:
1. Open the SQL tab. 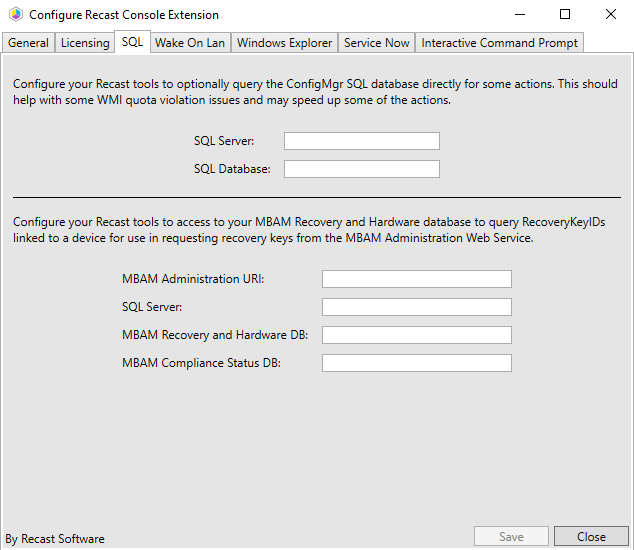
2. Enter the following details:
- SQL Server: FQDN of the Server that hosts the SQL database for ConfigMgr
- SQL Database: Name of the database hosted on the above server (usually CM_Three letter site code)
3. If you have MBAM in your environment, enter:
- MBAM Administration URI: Administration URI for your MBAM server, the address is usually correct after the FQDN is entered unless it was changed at the time of installation
- SQL Server: FQDN of the server that hosts the SQL Database for MBAM
- MBAM Recovery and Hardware Database name (default name is entered)
- MBAM Compliance Status Database name (default name is entered)
4. Click Save.
Wake on LAN settings impact all WOL packets sent by Recast.
Right Click Tools with Recast Management Server
If you are using Right Click Tools Enterprise with Recast Management Server, Wake on LAN settings can be configured in your Recast Management Server Settings.
To configure Wake on LAN options in RMS:
1. In your Recast Management Server, navigate to Administration > Settings.
2. Under ConfigMgrServer options, configure the following settings:
- WakeOnLanPort: Sets the UDP port from which WoL packets will be sent.
- Unicast: Determines if WoL packets are sent with unicast or subnet directed broadcasts.
- NumberOfPackets: Sets the number of WoL packets to send when trying to wake up devices.
Right Click Tools Standalone
If you are running Right Click Tools Enterprise in Standalone mode, you can set Wake on LAN options in the Configure Recast Console Extension application.
To open the Configure Recast Console Extension application, open the Windows Start menu and select Configure Recast Console Extension.
TIP: You can also access the Configure Recast Console Extension application from your Configuration Manager console by navigating to Assets and Compliance > Recast Software and clicking Configure Recast in the 'How Can We Help?' section.
To configure Wake on LAN options in Configure Recast Console Extension:
1. Open the Wake On Lan tab.

2. Enable Unicast Mode to send Wake on LAN packets with unicast or subnet directed broadcasts.
3. Set the Port to use and the Number of Packets to send when trying to wake up devices.
4. Click Save.
Interactive Command Prompt setup is done in the Configure Recast Console Extension application regardless of whether you've installed Right Click Tools with or without Recast Management Server. The Interactive Command Prompt tool requires a download of PsExec from the Microsoft website before proceeding.
To configure the Interactive Command Prompt:
1. Open the Configure Recast Console Extension application by clicking the Windows Start menu and selecting Configure Recast Console Extension.
TIP: You can also access the Configure Recast Console Extension application from your Configuration Manager console by navigating to Assets and Compliance > Recast Software and clicking Configure Recast in the 'How Can We Help?' section.
2. On the Interactive Command Prompt tab, click to Download the PsExec utility from Microsoft.
3. Click Browse and navigate to your local path or copy PsExec over manually into the Local Path field.

4. Save your changes.
