There are two types of permissions that will allow the Recast Management Server installer to automatically create the SQL database with all the necessary permissions:
- The user account running the installation can be assigned a SysAdmin role in the SQL instance. If the user account has permission to connect remotely, use the Test SQL Connection button to check connectivity to the SQL Server during the install. After the RMS installer creates the database, the SysAdmin permission can be removed. NOTE: Before removing SysAdmin permissions on the newly created database, check that db_owner permissions are granted on the database for the computer account running the Recast Management Server app pool. Add db_owner permissions, if missing. This additional step may only be required for a remote SQL server.
- The computer account of the Recast Management Server can be granted db_creator permissions. In this case, check the Skip SQL Connection Test box on the installer's SQL Configuration page.

Pre-create the RecastManagementServer Database
If the account running the Recast Management Server installer does not have permission to create a SQL database, the database administrator can pre-create a database named RecastManagementServer and assign permissions manually.
Remote SQL Server: Where the database is remote from the Recast Management Server, assign db_owner permissions on the database to the computer account of the Recast Management Server.
Local SQL Server: Where the database is local to the Recast Management Server, assign db_owner permissions on the database to the IIS AppPool\Recast Management Server account.
NOTE: The IIS AppPool\Recast Management Server account will not exist until after the installation is finished, so db_owner permissions will need to be assigned after installation.
Add the Computer Account via SSMS
If the computer account for the Recast Management Server computer does not exist in SQL, users will need to add the computer account manually, as a Login Account in SQL Server Management Studio (SSMS).
Add the Computer Account as a Login Account
To create the computer account as a login account:
1. Open SSMS and expand the folder of the server instance in which you want to create the new login.
2. Right-click on the Security folder, point to New and select Login.
3. In the Login - New window, on the General page, enter the Login name of the account in the following format: <domain name>\<computer name>$. Including the dollar sign ($) treats the login name as a computer account rather than a user account.
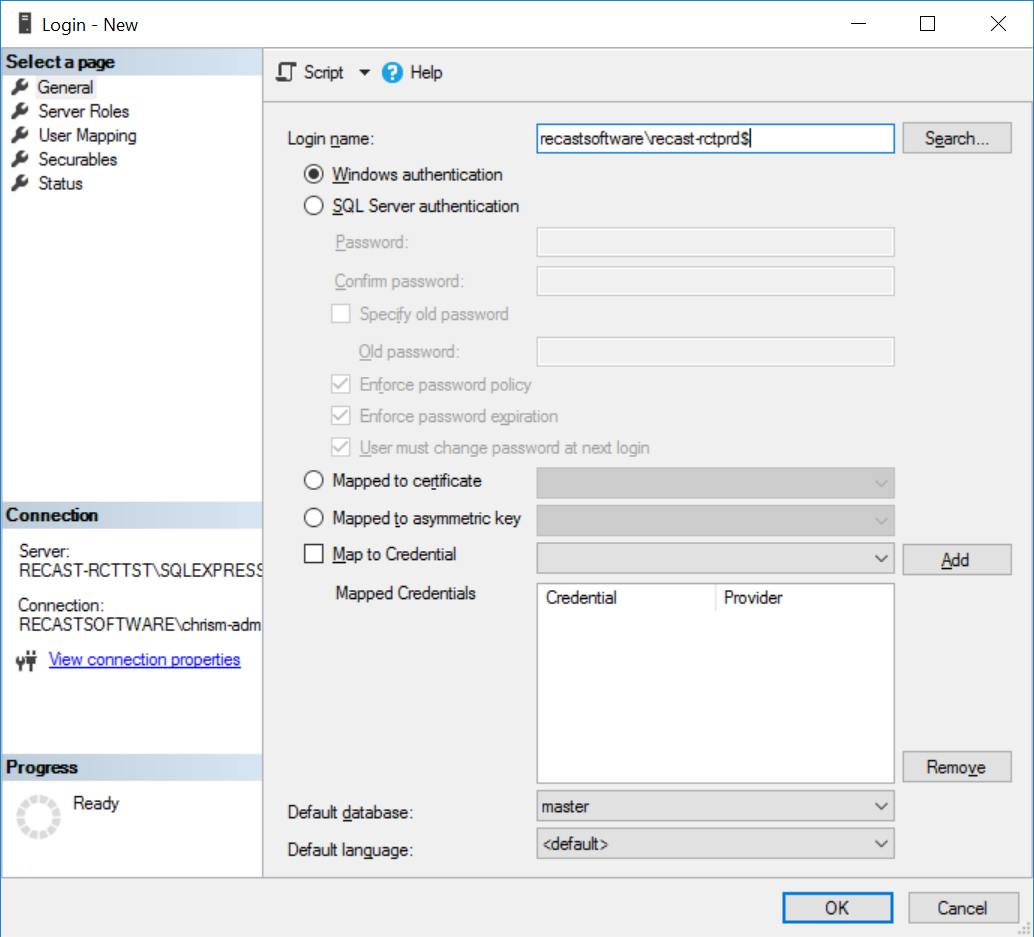
4. On the User Mapping page, in the Users mapped to this login section, select RecastManagementServer.
5. In the Database role membership section, select db_owner.
Recast Management Server software can be installed on its own server or on the primary Configuration Manager server. For a step-by-step visual guide to installing and configuring RMS, see our Recast Management Server Installation Tutorial.
Run the Recast Management Server Installer
After downloading Recast Management Server from the Recast Portal, run the installer and follow its prompts.

IIS
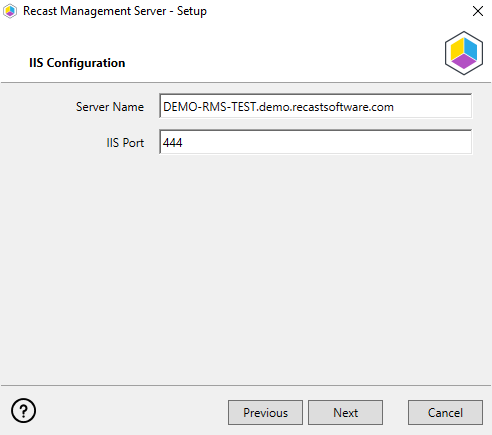
To configure IIS:
1. On the IIS Configuration page, change the Server Name only if the client is going to use a DNS alias.
2. Set the IIS Port. The default IIS Port is TCP 444, to prevent conflicts when Recast Management Server is installed on Configuration Manager servers. The IIS Port can be changed to 443, or any open TCP port, to suit your environment.
Certificates
Recast Management Server requires a certificate for secure communication with Right Click Tools and any Recast Proxies.
To configure a certificate:
On the Certificate Configuration page, we recommend that you Use an Existing IIS Certificate issued by a trusted Certificate Authority (CA). If you choose to Generate a Self-Signed Certificate, you must import the Recast Management Server self-signed certificate to the Trusted Root Certificate Authorities store on devices running Right Click Tools, Recast Agent, or Recast Proxy.

CERTIFICATE NOTES:
- The certificate subject name (or a subject alternative name) should match the server name in the URL that Right Click Tools and Recast Proxies are pointed toward.
- Right Click Tools will prompt for any untrusted certificates and add them to an allowed list.
- The certificate can be changed later by editing the Binding in IIS Manager.
SQL Server
There are two types of permissions that will allow the Recast Management Server installer to automatically create the SQL database with all the necessary permissions:
- The user account running the installation can be assigned a SysAdmin role in the SQL instance. If the user account has permission to connect remotely, use the Test SQL Connection button to check connectivity to the SQL Server during the install. After the RMS installer creates the database, the SysAdmin permission can be removed.
- The computer account of the Recast Management Server can be granted db_creator permissions. In this case, check the Skip SQL Connection Test box.
SQL SERVER NOTES:
- The default SQL Server Port Number is 1433.
- Recast strongly recommends a fully licensed version of SQL to avoid the 10GB storage limitation of SQLExpress. SQLExpress use is only supported for POC implementations of Right Click Tools.
- After the SQL database is created, set the database recovery model to simple to prevent storage issues.
- Remote SQL Server: The computer account of Recast Management Server will need db_owner permissions to create the database on the remote device. If the account running the Recast Management Server installer does not have permission to create a SQL database, the database administrator can pre-create the RecastManagementServer database and manually give the computer account db_owner permissions.
- Local SQL Server: The IIS AppPool\Recast Management Server account will need db_owner permissions to create the database on the local device. Alternatively, the database administrator can pre-create the database and give the IIS AppPool\Recast Management Server account db_owner permissions to the database. The IIS AppPool\Recast Management Server account will not exist until after the installation completes, so the permissions will need to be given after installation.
Import License
You can download and import your Recast licenses when installing Recast Management Server.
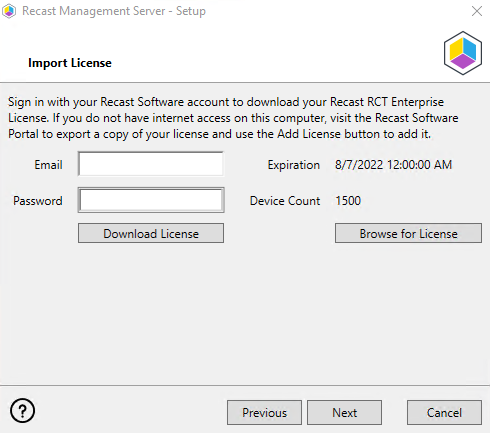
To download your Enterprise license:
1. On the Import License page, enter your Recast Portal email address and password.
2. Click Download License. The license information will appear in the right-hand column.
NOTE: If your server does not have internet access, click Browse for License to browse the filesystem for a license file that has been exported from the Recast Portal.
Proxy
If the Recast Proxy is being installed on a server other than the Recast Management Server, install the Proxy separately after Recast Management Server installation.
NOTE: Proxy configuration is optional for Privileged Access where Active Directory or Entra ID objects are not used to target rules.
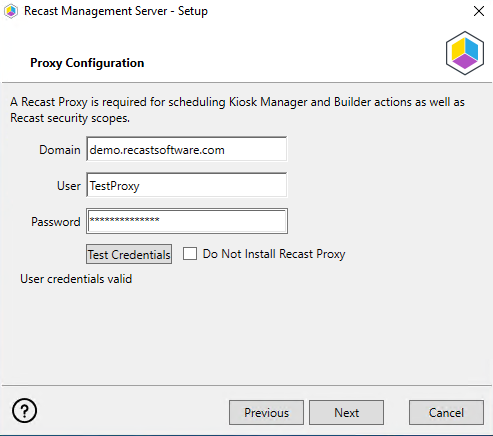
To configure the proxy during RMS installation:
On the installer's Proxy Configuration page, enter the service account Domain, Username, and Password and click Test Credentials to verify service account details.
TIP: If you haven't already set up the required proxy permissions, remove any information from the text fields, select Test ConfigMgr Connection and the Skip ConfigMgr Verification checkbox, and click Next.
Domain
To configure your domain:
1. On the Domain Configuration page, enter the Domain Name.
2. Click Test Domain Connection to verify that the service account has access to read from your domain. The test should show Success.

Configuration Manager
NOTE: Configuration Manager does not need to be set up for Privileged Access.
To set up your Configuration Manager for the proxy:
1. On the Configuration Manager Configuration page, enter the following information:
- Name of the site server that has your SMS Provider role
- Site Code
- Name of the SQL Server where your Configuration Manager SQL database is located
- SQL Database name
NOTE: You can skip the Configuration Manager Configuration page during Recast Management Server or Recast Proxy installation by removing any information from the text fields, selecting Test ConfigMgr Connection and the Skip ConfigMgr Verification checkbox, and clicking Next.
2. Click Test ConfigMgr Connection to check that the service account has access.

MBAM
MBAM configuration is only required for a separate MBAM Server. If you are using the ConfigMgr-integrated BitLocker or AD, you can skip this section. MBAM also does not need to be configured for Privileged Access or Patching.
To configure MBAM:
1. Tap Click Here to Configure MBAM.
2. Add your Administration URL and SQL Server information.
3. Click Test MBAM Connection to verify that the service account has access to MBAM.

Initiate RMS Installation
Once you have filled in all the necessary information, click Install at the bottom of the MBAM Configuration page.
When the installation is complete, open the Recast Management Server by navigating to https://<Server FQDN>:<Port> in a web browser (Chrome, Edge, or Firefox are recommended).
When asked to sign in, enter the username and password for the account used to install the Recast Management Server.
Installation Log Location
To check the installation logs for Recast Management Server and Recast Proxy (when installed together), navigate to C:\Users\<user account running the install>\AppData\Local\Temp
NOTE: The log is named something like Recast_Management_Server_2022*****.log
Follow our step-by-step guide to installing and configuring a Recast Management Server in your environment.
This comprehensive tutorial covers:
- Downloading the installation and license files
- Running the installer and importing the license
- Launching the Recast Management Server website
- Running Recast Management Server health checks
- Setting up user permissions
- Configuring routes and service connections
- Deploying the Recast Agent application
The Recast Management Server requires access to specific external domains depending on which Recast Software products are in use. If you are using a web proxy on the Recast Management Server, or on the server running Recast Proxy, you will need to direct network traffic to those external domains through the web proxy, as the web proxy will not automatically detect settings on the server where the RMS or Recast Proxy is installed.
You can direct network traffic through the web proxy by changing the environment variables in your Recast Management Server web.config file.
To change environment variables for a web proxy:
1. Open the web.config file located at C:\Program Files (x86)\Recast Software\Recast Management Server\web.config.
TIP: We recommend making a copy of the existing web.config file before editing.
2. In the aspNetCore module, edit the Environment Variables information and add opening and closing tags.
<environmentVariables>
  <environmentVariable name="all_proxy" value="http://proxyserver:port" />
  <environmentVariable name="no_proxy" value="RmsServer.example.com,SccmServer.example.com" />
</environmentVariables>
For details about the environment variables used for default proxy initialization, see Http
3. Recycle the Recast Management Server application pool and restart the site in IIS.
After editing the environment variables in the web.config file, follow these steps to verify the web proxy settings are correct for the account running the Recast Proxy service.
4. Log into the server as the Recast Proxy service account, open Internet Options and verify the proxy information is correct there.
5. If you are defining the web proxy manually, navigate to Internet Properties > Connections > LAN settings and check that Automatically detect settings and Use automatic configuration script are deselected. If both those options and Use a proxy server for your LAN are configured, they will conflict.

NOTE: If the RCT Patching catalog fails to load and returns an error: 'The proxy tunnel request failed with status code 407', add a rule to allow NoAuth access from the Recast Management Server to the external domains required for RCT Patching.
A Recast Agent is installed on a computer and runs actions on that computer as the local system account. A Recast Agent should be deployed on each device you want to run actions against. After deploying Recast Agents, you can configure them to run Right Click Tools actions or for Fast Channel Support. You can also use the same Recast Agent for Insights and Privileged Access.
To learn more, see Recast Agents and Recast Agent Gateways.
Prerequisites for Deploying Recast Agents:
- If deploying 5000+ Recast Agents, follow the 503.2 IIS Error instructions to increase the appConcurrentRequestLimit before proceeding.
- If your Recast Management Server is using a self-signed certificate, you must first import the certificate into the Trusted Root Certificate Authorities Store on all devices that will have Agents.
Deploy Agents with Right Click Tools Patching
We recommend deploying Recast Agents using Patching. Your Right Click Tools Enterprise license alone gives you access to Patching to deploy Recast Agents. In the absence of Patching licensing, only the Recast Agent and Right Click Tools applications will be available in the Recast Catalog.
TIP: Alternatively, you can choose to deploy Recast Agents by downloading and running the Agent installer.
Prerequisites for Deploying Agents using RCT Patching:
- Recast Management Server is running Recast Software version 5.4 or later, as that version introduces Patching in RMS.
- Required proxy permissions for Patching are in place
To deploy the Recast Agent application:
1. If you haven't already done so, complete your initial Patching setup, skipping the Setup Wizard's Define Deployment Processes step.
2. Add a deployment process for the 'Recast Agent' application.
3. On the Deployment Process Details page, click the Settings cog to open your Global Deployment Process settings.

4. On the Advanced tab, set Additional Installation Parameters:
- Silent Agent Install: Add the RCTENTERPRISESERVER=https://<RMS FQDN>:<Port> parameter to your install string, substituting the FQDN and port number for your Recast Management Server.
- Connect Recast Agents to a specific Agent Gateway: Add the AGENTGATEWAY=https://<AG FQDN>:<Port> parameter to your install string, substituting the FQDN and port number for your Agent Gateway
NOTE: Adding these parameters in deployment settings enables deployed Recast Agents to connect to your Recast Management Server, verify that the certificate used by the RMS is trusted, and successfully enroll with the RMS. Recast Agents are required to enroll with the RMS before they can communicate with a Recast Agent Gateway and be used to run actions.
Agent Deployment Video Walkthrough
See Recast Application Deployment on our YouTube channel.
Deploy Agents with Configuration Manager
Option 1: Create a Patching deployment process but deploy Agents with ConfigMgr
By creating a Patching deployment process for the Recast Agent application without any deployment steps, you can automatically access new Recast Agent versions, with the correct install commands, and then use the Recast Agent application in a task sequence and/or to create deployments manually in Configuration Manager.
To create a deployment process without deployment steps:
1. When creating the deployment process, choose a collection.
2. Remove the deployment step.
3. Save the deployment process.
Option 2: Use ConfigMgr to manually package and deploy Agents
Silent Agent Install
Add the RCTENTERPRISESERVER=https://<FQDN>:<Port> parameter to your install string, substituting the FQDN and port number for your Recast Management Server.
Example:
msiexec.exe /qn /i "Recast Agent.msi" RCTENTERPRISESERVER="https://<RMS FQDN>:<Port>" /L*V "%temp%\RecastAgentMSI.log"NOTE: The default Recast Management Server port is 444. Inbound and outbound traffic over port 444 (or an alternative port you specify) must be enabled between the Recast Management Server and any device that has a Recast Agent in order for the Agent to be able to communicate with the server.
You can connect your Recast Agents to a specific Agent Gateway by adding the AGENTGATEWAY parameter to your install string.
Example:
msiexec.exe /qn /i "Recast Agent.msi" RCTENTERPRISESERVER="https://<RMS FQDN>:<Port>"
AGENTGATEWAY="https://<Agent Gateway FQDN>:<Port>" /L*V "%temp%\RecastAgentMSI.log"By default, the RecastManagementServer database is set to full recovery. We recommend switching your SQL Server recovery model from full recovery to simple recovery to prevent the database from running out of disk space due to an overload of transaction logging.
To learn more about the difference between simple, full, and bulk-logged recovery, see Recovery Models (SQL Server) | Microsoft Learn.
To switch the SQL Server recovery model to simple recovery:
1. Open SQL Server Management Studio (SSMS).
2. Expand the Databases folder.
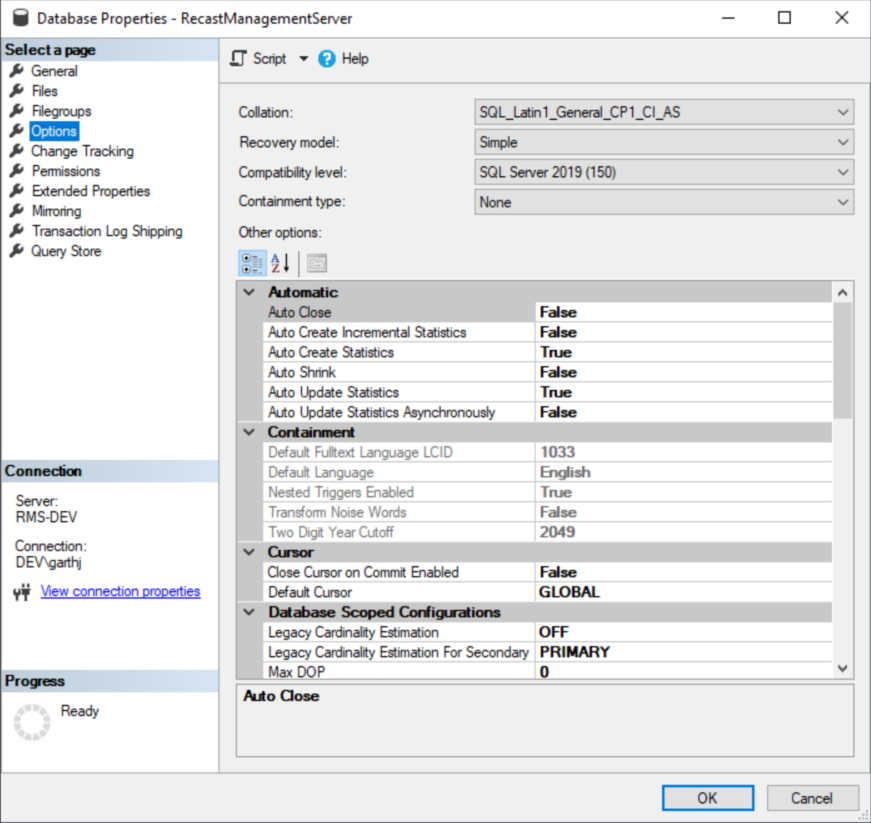
3. Right-click on the RecastManagementServer database and select Properties from the drop-down menu.
4. In Database Properties, click the Options page.
5. Change the Recovery model to Simple and click OK to save your changes.
Instructions for migrating your Recast Management Server database to a new server.
To migrate the RecastManagementServer database:
1. Back up your RecastManagementServer database.
2. Copy the database over to the new location.
3. Navigate to C:\Program Files (x86)\Recast Software\Recast Management Server on your management server and open the appsettings.Production.json file.
4. Update your server information in the .json file to specify the new server name.
5. Open IIS Manager, under Manage Website, click to Restart your Recast Management Server website.
6. Under Application Pool Tasks, click Recycle.
7. If the name changes for the server, update any Right Click Tools installations to point to the new server by adding the Recast Management Server URL on the General tab in the Configure Recast Console Extension application. 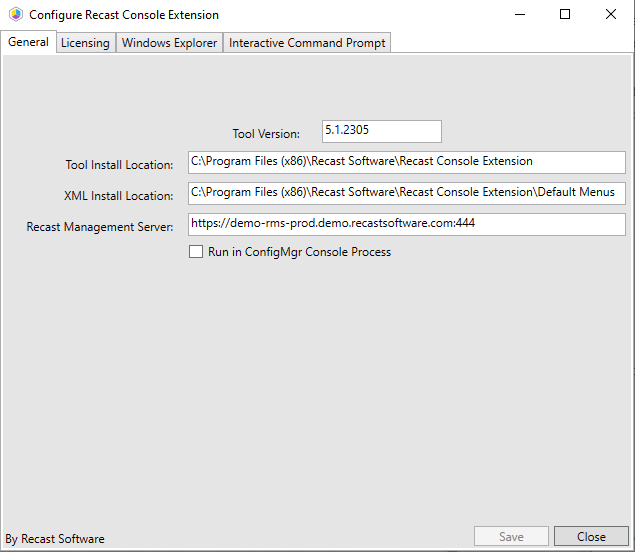
8. If you have agents in your environment, update the ServerUri registry keys to point to the new server’s name.
Agent Server Uri Registry Entry:

Real-time antivirus protection can cause issues on Configuration Manager site servers, site systems, and clients.
The recommendations in this article are meant to help you diagnose causes of potential instability on a device when running antivirus software alongside a supported version of Recast Management Server (RMS), Recast Agent Gateway, Recast Proxy, and/or Recast Agent.
We suggest temporarily applying these exclusions to evaluate a system. If system performance or stability improves as a result, contact your vendor for instructions or an updated antivirus software version.
Folder Exclusions for RMS and Agent Gateway
%SystemRoot%\IIS Temporary Compressed Files
%SystemRoot%\inetpub\temp\IIS Temporary Compressed Files
File Exclusions for RMS and Agent Gateway
%windir%\System32\inetsrv\w3wp.exe (x86 systems)
%windir%\SysWOW64\inetsrv\w3wp.exe (x64 systems)
Process Exclusions
Process exclusions are only needed when aggressive antivirus programs consider Recast executables (.exe) to be high-risk processes.
Process Exclusions for RMS and Agent Gateway
C:\Program Files (x86)\Recast Software\Recast Agent Gateway\Recast.AgentGateway.exe
%windir%\System32\inetsrv\w3wp.exe (x86 systems)
%windir%\SysWOW64\inetsrv\w3wp.exe (x64 systems)
Process Exclusions for Agent Gateway (Kestrel)
C:\Program Files (x86)\Recast Software\Recast Agent Gateway\Recast.AgentGateway.exe
SQL Exclusions
On your SQL server, we recommend following Microsoft's guidance: Configure antivirus software to work with SQL Server - SQL Server | Microsoft Learn
Intrusion Detection and AV Software with Insights
Intrusion detection and AV software, such as CrowdStrike and Carbon Black, will sometimes prevent Insights from completing its setup. This is due to the EI setup uploading 250+ reports to your Configuration Manager Reporting Point within a short period. To work around the issue, exclude the EI setup or temporarily exclude EI setup during any installation, on both the ConfigMgr site server where the setup is run and on the SQL Server Reporting Service (SSRS) server.
