
Deployment process information:
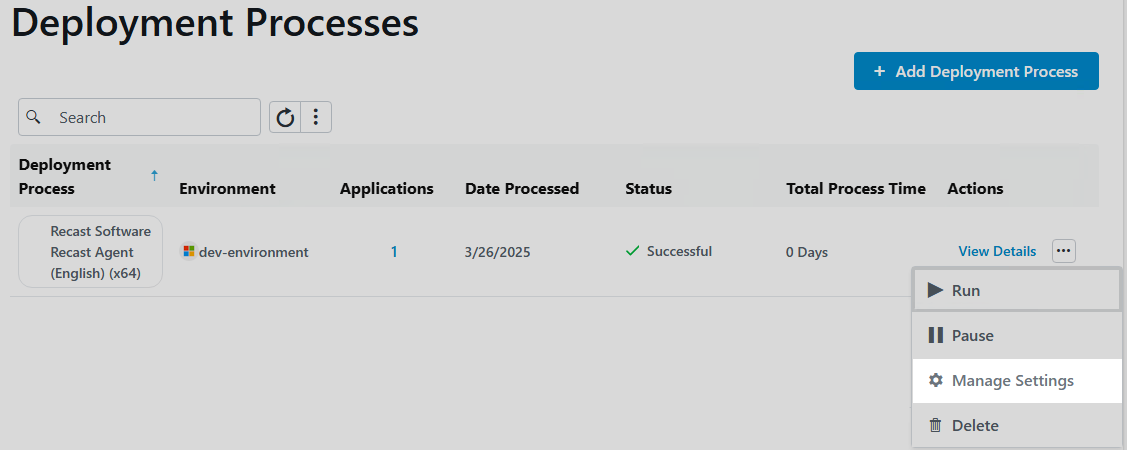
- Environment: Displays the Configuration Manager or Intune environment targeted by the deployment process.
- Applications: Number of applications in the deployment process. Click the number to view and manage the applications in the deployment process.
- Date Processed
- Status of the deployment process:
- Successful - The application was imported successfully to MECM.
- Running - The application import is in progress.
- Pending run - A new deployment process that has not started. To start the deployment process, click the ellipsis (...) in the Actions column and click Run.
- Paused - The deployment process is temporarily stopped and Patching won't import new versions of the selected applications.
- Warning - The application was imported into Configuration Manager, but Patching wasn't able to create all the specified deployments. Make sure any specified collections/group are set up.
- Error - The application import failed and requires troubleshooting.
- Total Process Time: The number of days from the start of the first deployment step to the end of the last deployment step.
- Actions
- View Details including the applications included, the total duration, the list of deployment steps, and any delays.
- Click the ellipsis (...) to Run, Pause or Delete the deployment process. Select Manage Settings to modify all deployment process related settings.
- Click the vertical ellipsis to the right of the search bar to Pause All Deployments or Run All Deployments.
 Run All Deployments: Once you click Run in the confirmation dialog, the action will add all processes, including those that are paused, to the queue and run them consecutively. You can pause an individual deployment process to remove it from the queue.
 Run All Deployments: Once you click Run in the confirmation dialog, the action will add all processes, including those that are paused, to the queue and run them consecutively. You can pause an individual deployment process to remove it from the queue.
As you add collections/groups to your deployment process and set the start of each deployment step, the timeline will reflect the duration and schedule for the deployment process. You can scale the timeline by Week or by Month. The total deployment duration is the number of days from the deployment availability time (in Software Center) to when the application is installed automatically.
Example Deployment Process
In this example, Google Chrome, Mozilla Firefox, and Microsoft Edge are deployed to the Testing Devices and All Users collections.
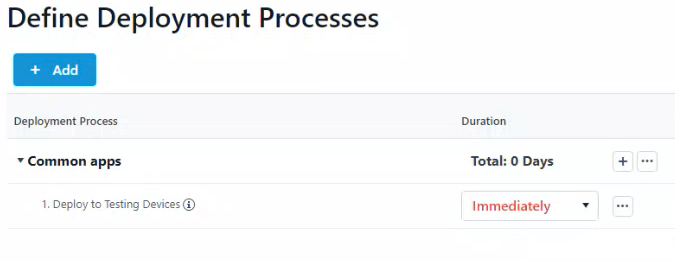
- The deployment to Testing Devices will start immediately after the selected application is imported into the environment.
- The deployment to All Users becomes available after a 2-delay delay.

TIPS:
- Hovering over a grey bar on the timeline opens a summary of when the deployment is available and when it will be installed automatically.
- Clicking on the Settings icon to the right of an application displays the deployment process settings associated with that specific application. By default, applications inherit settings from the deployment process. You can override the default settings by configuring different options for an individual application.
By default, Right Click Tools Patching checks the Patching Catalog for application updates every 30 minutes. You can also choose to manually trigger a check for any new versions of applications included in a deployment process.
To check for application updates on the Deployment Process Details page, click Check for Updates.
If an application included in the deployment process has an update available, the deployment process will run.

A deployment process defines a set of applications to be deployed to specified collections or groups in ConfigMgr and/or Intune environments. A deployment process is made up of one or more individual deployments, each of which deploys the same set of applications out to different device or user collections or groups.
For deployment processes with more advanced settings, we recommend configuring options on the Deployment Processes page, rather than via the Initial Setup Wizard.
Create a New Deployment Process
Each deployment process consists of applications to deploy and the collection(s) or group(s) to which the applications will be deployed. You can deploy applications concurrently to ConfigMgr and Intune environments.
To create a new deployment process:
1. In your Recast Management Server, navigate to Patching > Deployment Processes.
2. On the Deployment Processes page, click Add Deployment Process.
3. In the Select Environment side panel that opens, choose a Configuration Manager or Intune environment that is listed as 'Ready'. Click Next.
4. Search for and select the applications to deploy with this deployment process. Click Next.
5. Name the deployment process and click Next.
6. Search for and select the ConfigMgr collection or Intune group to which you'll first deploy the chosen applications. You may, for example, want to start by deploying the applications to a collection of Testing Devices.

TIP: When creating an Intune deployment process, you can also choose the All Devices or All Users built-in groups in the Add group side panel.
7. Click Save & Close to return to the Deployment Processes page. The first deployment step will be listed under the deployment process name.
8. Set when the deployment will be forced. You can choose to initiate the installation Immediately or you can give users a grace period of 1-7 days to manually set their deployment time before the installation is forced.
Settings for new deployments are automatically inherited from the Global Deployment Settings. The default deployment type is Required. The option can be edited in the deployment settings.
Deploy Applications to Another Collection or Group
You can deploy the same application updates to another collection or group by adding a deployment step to your deployment process.
To add a deployment:
1. Click the plus sign (+) to the right of the deployment process name. In this example, the deployment process is named Common apps.
 2. In the Add Collection side panel that opens, select the collection or group to which the applications will deploy next. In this example, the target collection is IT Department Devices.

3. Click Save & Close to return to the Deployment Processes page. A second deployment will be listed below the first.
To edit a collection, click the ellipsis (...) to the right of a deployment step and select Edit Collection from the drop-down.
You may want to add extra time ahead of a deployment step to, for example, allow for feedback following the initial test deployment. You can delay an individual deployment step by up to 30 days.
To add a delay:
1. Click the ellipsis (...) to the right of a deployment step.
2. Select Add Delay from the drop-down. A Delay X days row will appear above the chosen deployment step, meaning that the delay will happen before that step.
3. Select a number of days to delay the next deployment step in the list.
TIP: Hovering over a delay on the timeline opens a summary of delay details.

Add a PowerShell script or an executable command to one or all deployment processes to run specific actions before and/or after installing or uninstalling application versions.
Example uses:
- Remove a previous application version from the endpoint prior to installing a new version
- Show users a notification to close the application before installation
- Apply the organization's default settings to the application after it installs
- Back up data before uninstalling an application
For a couple of real-world examples, see Aapo Kettunen's blog post: Pre- and Post-Install Actions in Right Click Tools Patching (ConfigMgr & Intune).
To add a pre- or post-install or pre- or post-uninstall action:
1. Navigate to the Installation and Uninstallation section in your deployment process settings or global settings, depending on whether you are adding an install or uninstall action to one deployment process or all deployment processes.
Single deployment process: From the Deployment Processes page, click the ellipsis (...) to the right of the deployment process and select Manage Settings. In the Deployment process settings side panel, click Advanced.
TIP: You can run install actions for an individual application by creating a deployment process that includes only that one application.
All deployment processes: From the Settings page, click the Settings cog to the right of the environment. On the Environment Settings page, click Deployment Processes > Advanced.

2. Enable Pre Install Action, Pre Uninstall Action, Post Install Action, or Post Uninstall Action by toggling the setting to 'Yes'.
3. In the side panel, select PowerShell or Executable.
Script
- Select Use inline PowerShell script to add your PowerShell script directly within the inline editor.
- Select Specify UNC path to PowerShell script file to add a folder path under Additional Files & Folders. Files included here are copied to the RecastAM folder in your application's deployment package. To reference files in the installation scripts, prefix them with the relative path. Ex. RecastAM\Script.cmd
Executable
- Enter an Installation Command and optional Parameters.
- You must add the installation command under Additional Files & Folders if it does not already exist on the device. Files included here are copied to the RecastAM folder in your application's deployment package.
- Add Parameters to your command (optional). You can include variables (Application, Publisher, Architecture, Language, Version) by choosing one or more from the drop-down menu.
- The full install command will display below the field as you build it. Ex. /silent/log:"%temp%\Microsoft\Office 365_1.022.1076.log"
NOTE: Add quotation marks around executable names that include spaces.
4. Click Save & Close.
As of Recast Version 5.11.2603.1313, you no longer view, create or edit a deployment process schedule on the Deployment Processes > Advanced tab. That functionality has moved to the Events page.
By default, deployment processes run whenever Right Click Tools Patching detects a new application version in the Application Catalog. By adding a scheduled event, you can control when a deployment process begins.
NOTE: When you create a new deployment process, it will immediately run once before it begins to follow the schedule.
To create a scheduled deployment process event:
1. On the Events page, click Add Event.

2. In the side panel that opens, add a Name and Description for the new event.
3. Select an Event Type from the drop-down menu.
NOTE: Currently, 'Patch Tuesday' is the only scheduling option. Microsoft's security update release occurs on the second Tuesday of each month. Future Recast releases will add more scheduling types.
4. Add a Delay of 1 to 14 days, if desired.
5. Choose the Time of day to apply the update (in UTC time).
NOTE: The precise time of a scheduled deployment is tied to the update check interval. Patching checks for new application versions every 30 minutes by default, meaning that the scheduled deployment will run 0 to 30 minutes after the check.
6. Click Save.
To have a deployment process run according to a scheduled event you've created:
1. On the Deployment Processes page, click the Events link for a deployment process.

TIP: You can also click the Events link on the Deployment Process Details page.
2. Toggle the scheduled event to 'Active' and deactivate the default New Version Available event.

By default, all the applications included in a deployment process inherit the same settings. You can, however, choose to configure different deployment process settings for individual applications. Application-level settings will then override the deploy-process-level defaults.
To add deployment process settings at the application level:
1. On the Applications page, click the Settings cog to the right of an application.
2. In the side panel that opens, edit the settings that you want to change for this application only.
3. Click Save.
TIP: On the Applications page, look for the blue Settings cog badge that indicates an application with customized deployment process settings.
![]()
Wondering which settings will actually be applied when deploying a specific application?
The Effective Settings grid displays all the effective values that will be used when deploying the application.
For each application in a deployment process, you can view the default settings applied at the system, environment, and deployment process levels, as well as any custom settings that will override the defaults for individual applications.
To view the effective settings for an application, click the Settings cog to the right of an application on the Deployment Process Details page.
![]()
The Effective Settings table displays all the settings inherited at the System Default, Environment, Deployment Process, and Application level. Cells highlighted in green indicate the values to be applied during deployment.

By default, applications indicated as dependencies are automatically added to deployment processes. You also have the option to prevent dependencies from being added, which may be helpful if a specific dependency is known to cause issues when updating applications with RCT Patching. For example, see Issues Updating Adobe Acrobat Products.
NOTE: Make sure you manage any excluded dependencies manually to ensure that applications continue to work correctly.
Exclude Dependencies for an Application
Recast recommends configuring dependency exclusions using application settings rather than deployment process settings.
To exclude dependencies for a specific application:
1. On the Applications page, click the Settings cog to the right of an application.
![]()
2. In the side panel, open the Advanced tab and scroll down to the Dependencies section.
3. Toggle Exclude Dependencies to 'Yes'.
4. Click Save & Close.
Exclude Dependencies from a Deployment Process
To exclude dependencies from individual or all deployment processes:
1. Navigate to the Dependencies section in your deployment process settings or global settings, depending on whether you are excluding dependencies from one deployment process or all deployment processes.
For an individual deployment process: From the Deployment Processes page, click the ellipsis (...) to the right of the deployment process and select Manage Settings. In the Deployment process settings side panel, open the Advanced tab.
All deployment processes: From the Settings page, click the Settings cog to the right of the environment. On the Environment Settings page, click Deployment Processes > Advanced.
2. In the Dependencies section, toggle the Exclude Dependencies setting to 'Yes'.
3. Click Save & Close.
The settings you can choose at the deployment process or deployment level are the same as those listed under Global Deployment Process Settings and Global Deployment Settings, but these affect only a single deployment process or deployment.
Settings marked with a caution icon are set directly within the deployment process. Any changes to global settings won't be inherited by this setting.
To review and/or edit your deployment process settings on the Deployment Process Details page, click the ellipsis (...) next to a deployment step.

Available options:
- Include Weekends
- Delete Deployment Step
- Move up a deployment step
- Move down a deployment step
You can manage the applications included in a deployment process straight from the Patching Deployment Processes page.
Click on a number in the Applications column to view, add or remove applications. The list of applications is searchable and sortable.
Sort the Application List
By default, the application list is sorted in ascending order, first by vendor and secondly by application name. Where sorting is applied, the selected options appear next to the column header label.
To sort the application list differently:
1. Click on a column header one or more times to cycle through and select sorting options.
2. Click Save & Close.

Add an Application to a Deployment Process
To add an application to the application list:
1. In the Select Application(s) side panel, click the checkbox to the left of the application to add.
2. Click Save & Close.
Remove an Application from a Deployment Process
To remove an application from the application list:
1. In the Select Application(s) side panel, click the X to the right of the application to remove it.
2. Click Save & Close.
When you pause a deployment process, Right Click Tools Patching temporarily stops importing new versions of the selected applications. If a deployment process is running, it will be paused after completion.
Pause a single deployment process
To pause a deployment process from the Deployment Processes page:
1. On the Patching Deployment Processes page, click the ellipsis (...) to the far right of the deployment process you want to pause.
2. Select Pause from the drop-down menu and confirm the pause.
The status of the deployment process will change to Paused.
To resume a paused deployment process, click Run in the same drop-down menu.
To pause a deployment process from the Deployment Process Details page:
On the Deployment Process Details page, click the vertical ellipsis and choose Pause from the drop-down.

Pause all deployments
You can choose to put all deployments on hold at once.
To pause all deployments:
1. On the Patching Deployment Processes page, click the vertical ellipsis next to the search bar.
2. Click Pause All Deployments.

To resume paused deployment processes, click Resume in the same drop-down menu.
When you delete a deployment process, the applications included in it are no longer updated as new versions become available.
NOTE: These steps remove the deployment process from Right Click Tools Patching. To completely remove the applications, you'll also need to delete the deployments and the applications in your Configuration Manager console or in Intune.
To delete a deployment process:
1. On the Patching Deployment Processes page, click the horizontal ellipsis (...) next to the deployment process to delete.
2. Select Delete from the drop-down and confirm the deletion. This action cannot be undone.
TIP: You can also delete a deployment process from the Deployment Process Details page by clicking the vertical ellipsis, selecting Delete Deployment Process, and confirming the deletion.

To delete an individual deployment step:
1. On the Deployment Process Details page, click the ellipsis (...) to the right of a deployment step.
2. Select Delete Deployment Step from the drop-down and confirm the deletion.
