Recast Builder is an automation engine that allows you to customize Recast actions. Builder can be used with any of Recast's pre-built actions, or you can build your own tools using different Right Click Tools, PowerShell scripts, Registry Edits, WMI Calls, and more. Builder actions can then be saved, shared using role-based permissions, and run using Recast Runner.
Recast Builder is available in a number of Configuration Manager console locations. To open the Builder interface, right click in the console and navigate to Recast Automation > Recast Builder.
For Recast Builder webinars and video tutorials, see the Automation playlist on our YouTube channel.
To explore a shared library of Recast Builder actions and workflows, see our Community Recast Automation Repository. Learn more
The Recast Builder interface consists of a central canvas surrounded by three panels.

On the left
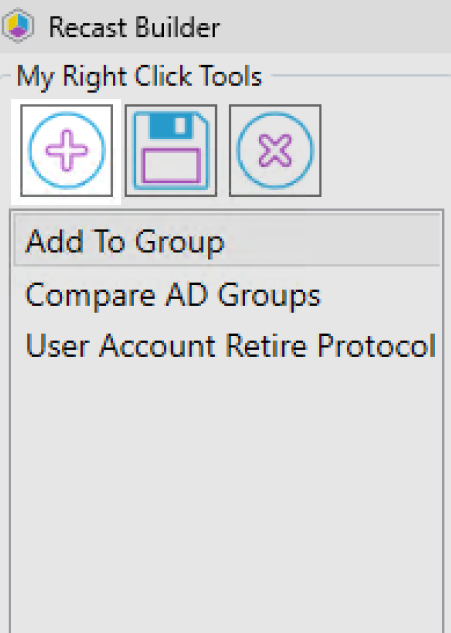
A. My Right Click Tools panel: Displays the icons for adding a new action, saving the current action, and deleting saved actions. Saved actions and pre-built templates are accessible from the panel according to where they were created in the Configuration Manager console. If, for example, Recast Builder is accessed from Devices, tools for editing devices will be displayed.
On the right
B. Recast Actions panel: This searchable list displays hundreds of available actions by category. For a full list of available actions, see the Recast Actions Catalog.
In the center
C. Canvas: Drag and drop your saved Right Click Tools, pre-built templates, and Recast Actions onto this area to work with them. The Start Node represents the object selected when running the action, such as a device or user.
D. Viewfinder: Use this box to move around the canvas and to adjust settings including the zoom level, centering and fill.
At the bottom
E. Properties and parameters: Different sections appear at the bottom of the interface depending on what is selected on the canvas.
Action Properties: Configure View, Name, Display and Action Type options for your custom tools.
See Configure Action Properties.
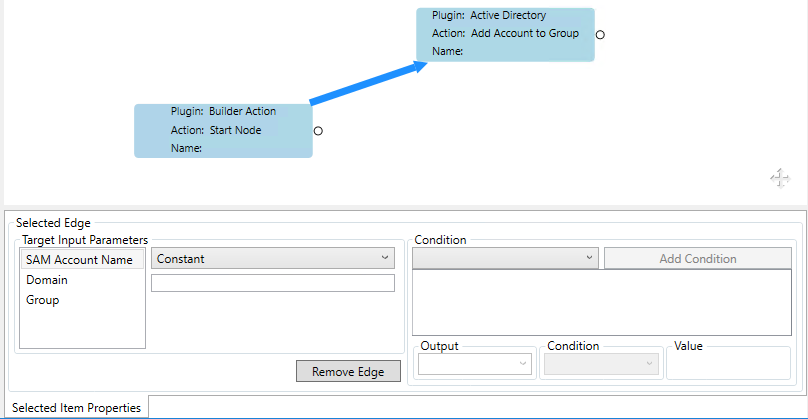
Target Input Parameters: Map a parameter to a constant value or to a specific property or step.
See Map Target Input Parameters.
Custom Input Parameters: Provide users with input options before an action runs. Common uses include choosing a collection to which a device will be added, choosing whether to force a full inventory cycle upon completion, and having an admin input a PowerShell script.
See Set Custom Input Parameters.
Conditional Responses: Set conditional responses to skip actions based on the results of previous actions.
See Set Conditional Responses.
To create a new custom tool in the My Right Click Tools list, click the New Action button (+ sign).
Recast offers a set of pre-built actions to get you started with Builder. These workflows are made up of a sequence of actions, and can be used as-is or as a starting point for creating your own custom Right Click Tools. For a description of the tasks included in each pre-built sequence of actions, see Recast Builder Actions.
Pre-built actions are listed in the My Right Click Tools panel. The Builder Actions displayed will vary depending on where you've opened Builder in your Configuration Manager console. For example, when Builder is accessed from Users, the templates that include user management actions will appear.

Drag-and-drop the templates onto the canvas to view and/or edit the actions they include. Pre-built actions often require some configuration in Builder. For instructions, see Configure Builder Actions.
In addition to the pre-built actions available within Builder, you'll also find a growing collection of Recast actions and workflows in our Community Recast Automation Repository. You can import any of the templates from this shared library into Builder.
You can add any of the actions listed in the Recast Actions panel to create an automated workflow. For a list of all the available actions, see the Recast Actions Catalog.
To add actions to an automation sequence:
1. Use the Recast Actions search box or drill-down menu to select the desired actions.
2. Drag-and-drop each action onto the canvas area.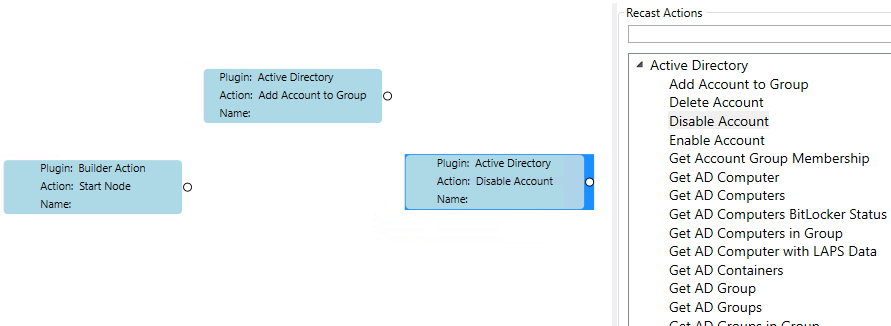
3. Order the sequence of actions from the Start Node to the first action by selecting the circle edge and dragging it to the first box.
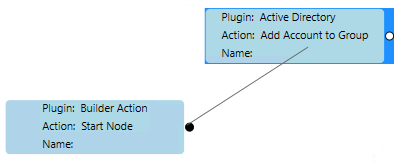
Builder will auto-select the Edge arrow in blue and populate the item properties in the Selected Edge section. Setting parameters will tell Configuration Manager which properties to change on the targeted object.
Choose Action Properties to determine the design and configuration of a Recast Builder action.
To choose action properties:
1. On the canvas, click the Start Node (the object the user will click on to run the tool).
2. Under Action Properties, specify the View, Name, Display and Action Type, which are described below.
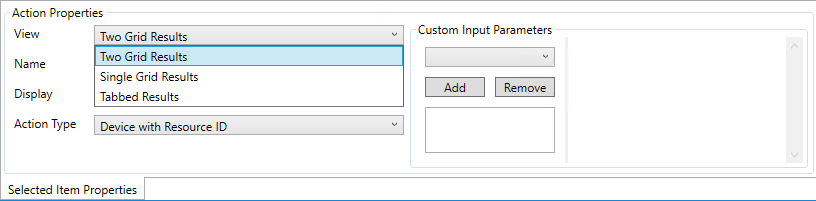
View
The View field determines how the results of a Right Click Tools Builder tool will display. View options do not affect the technical operation of Right Click Tools Builder tools — they only affect how results are displayed.
View Options:
- Single Grid Results
- Two Grid Results
- Tabbed Results: Shows a result for each step of the tool

Name
Name sets the name of the Recast Builder tool. After entering a new tool name, click the Save icon in the My Right Click Tools panel.
Display
Display sets the Configuration Manager object that the Right Click Tools Builder tool is run against. Options differ according to the selected Action Type.
Example: For a tool run against a device, Computer Name would be an appropriate display option.
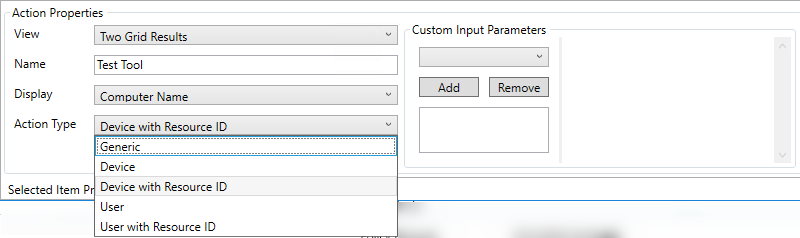
Action Type
The Action Type sets the properties on which the tool will take action.
Action Type Options:
- Generic: For all Right Click Tools Builder Tools acting on functions not related to users or devices.
- Device (with or without resource ID): For tools acting on devices. These tools will be available anywhere Right Click Tools device tools are available. The Resource ID is Configuration Manager's unique identifier for a computer object.
- User (with or without Resource ID): for tools acting on users. These tools will be available anywhere Right Click Tools user tools are available. The Resource ID is Configuration Manager's unique identifier for a user object.

Input Parameters can be used to offer administrators and end users with options before an action is run.
Examples of custom inputs:
- Choosing a collection to which a device will be added.
- Choosing whether or not to force a full inventory cycle upon completion.
- Having an admin input a PowerShell script.
To add an input parameter:
Under Custom Input Parameters, select an option from the drop-down list and click Add.
Parameter Options
- Boolean: Prompts the user running the action with an option to check or uncheck the parameter mapped to the Boolean.
- DateTime: Prompts the user running the action with an option to select the date and time.
- Integer: Prompts the user running the action with an option to set an integer value. You also have the option to set a default, minimum, and maximum value.
- TimeSpan: Prompts the user running the action with an option to set a length of time. A default value can be set, if needed.
- String: Provides two options - List or Textbox. This will prompt the user running the action to select or input a string.
List
Textbox
To remove an input parameter:
Under Custom Input Parameters, select a listed item and click Remove.
Parameters can be mapped to a constant value or a specific property or step. Constant values must be specified, whereas Parameter Mapping values can be pulled from any step of the existing tool to any property of the action being taken. This should be done for every parameter appropriate for the actions you are trying to take.
- Use a Constant value to hard code a value.
- Use Parameter Mapping for actions where you need to pull inputs from the user or where the properties of the object should change.
To map to a constant value:
Under Target Input Parameters, select Constant.
To map to a property or step:
Under Target Input Parameters, select Parameter Mapping, then select the Node and the Parameter from the drop-down lists.
Right Click Tools Builder lets you set conditional responses, allowing you to skip actions based on the results from previous actions. If the conditions are true, Recast Runner will execute the next step according to the specified workflow. If not, the next step (and any subsequent step in the chain) will be skipped.
Logical term options: And, Or, Less Than, Less Than or Equal To, Equal To, Greater Than, Greater Than or Equal To
To add a conditional response:
1. On the canvas, click on the edge (arrow) that connects the two actions between which you want to add a condition.
2. In the Condition section, click the New Condition icon (+ sign) and select a logical term from the drop-down list.
3. Associate the condition with a specific Output and/or input Value.
In this example, an "Equal To" condition has been set from the Computer Name to the name of device "XYZ".
Recast Builder Actions can help you quickly automate a workflow in your environment. These pre-built sequences of actions are designed to get you started using Recast Builder, introduce you to some of the automation features available in Builder, and help you start making tools on your own.
As of v5.1.2305.507, pre-built actions can be accessed from within Recast Builder, removing the need to import them into the interface. These actions will only appear in Builder, upon upgrade or with a fresh install, for deployments that do not already have existing Builder actions in place. To learn more, see Configure Recast Builder Actions.
Disclaimer: These Builder actions are provided on the basis that they can be edited, changed, and shared, but not sold. While every available effort has been made to be sure they work well and do what was intended, we can't anticipate the requirements of every conceivable Configuration Manager environment, so download/use at your own risk — no guarantees of function, support, or that they won't break something. As with everything, test first.
All Client Policies
This Builder action runs through all the Configuration Manager's client policies. This is great for new or recently re-built computers to force them to check into Configuration Manager.
This tool completes the following steps:
- Ping computer
- Machine Policy Retrieval and Evaluation Cycle
- Discovery Data Collection Cycle
- Hardware Inventory Cycle
- Software Inventory Cycle
- Send Unsent State Messages Cycle
- Software Updates Scan Cycle
- Application Deployment Evaluation Cycle
- State Message Cache Cleanup
- Windows Installer Source List Update Cycle
- Software Inventory Cycle
- File Collection Cycle
- Software Updates Deployment Evaluation Cycle
For v5 Releases: Now available in Builder, All Client Policies 5.xml
Add an AD User to an AD Group
This Builder action lets you add an AD user to an AD group from a list of groups.
For v5 Releases: Now available in Builder, Add To Group 5.xml
For instructions on setting up this template in Builder, see Configure Starter Pack Templates in Recast Builder.
BitLocker Recovery Password from Device
This Builder action grabs the BitLocker Recovery Password from any drive on a device. This uses a custom input parameter to allow users to choose what drive they want to grab the recovery password from.
This tool completes the following step:
- Get Recovery Password From Device
For v5 Releases: Now available in Builder, BitLocker Recovery Password 5.xml
Compare Two Users' AD Groups
This Builder action lets you compare the group memberships of two AD users. This action is particularly useful if, for example, you have a new team member and want to compare their group memberships to those of an existing team member.
This tool completes the following steps:
- Gets AD group membership for a selected user
- Prompts you to enter the AD username that you'd like to compare against the selected user
- Shows you group memberships for both users in tabbed results
For v5 Releases: Now available in Builder, Compare AD Groups 5.xml
User Account Retire Protocol
This Builder action automates a common task — taking steps when a person leaves an organization to secure their account credentials and prepare the account for retirement. It's easily adaptable to other user-based tasks as well, and is a nice jumping-off point for Recast Builder.
This tool completes the following steps:
- Prompts the admin running the tool to input a new password for the account
- Resets the password for the account to this password
- Disables the account
- Moves the account to a new OU
In the Target Input Parameters panel, you must specify a valid OU in your environment as a Constant value.
Format Example: OU=RecastUsers,DC=demo,DC=recastsoftware,DC=com
For v5 Releases: Now available in Builder, User Account Retire Protocol 5.xml
For instructions on setting up this template in Builder, see Configure Recast Builder Actions.
Reboot if Pending Restart Exists
This Builder action allows you to force a restart on systems that have a pending reboot scheduled, without requiring you to query for pending reboot data in advance. It's a friendly way to help your end users who hate to restart stay updated and compliant without requiring any personal intervention.
This tool completes the following steps:
- Ping Computer
- If Ping is successful, Check System Information Collection for Pending Restart Information
- If Pending Restart Exists, force a Reboot with a 5-minute timer and a user pop-up message: "Your computer needs to restart, please save and close in the next 5 minutes."
For v5 Releases: Now available in Builder, Reboot If Pending Restart Exists 5.xml
Video Overview
Fix Encryption Method
This Builder action automates the process of adding TPM and Numerical Key Protectors to BitLocker. It includes all the necessary precursor steps and enough intelligence to complete this task without admin intervention.
This tool completes the following steps:
- Stop MBAM Service
- Decrypt C: Drive
- A PowerShell Script with Progress Stream on to monitor the progress of the decryption, and proceed when successfully completed. (Here is the script)
#Wait for Decrypt Finish Write-Output "Waiting on Decrypt...." $encryption = Get-WmiObject -Namespace root/cimv2/security/microsoftvolumeencryption -Class win32_encryptablevolume -Filter {DriveLetter = 'C:'} $Percent = ($encryption.GetConversionStatus()).EncryptionPercentage While($Percent -ne '0'){ Start-Sleep -Seconds 10 $encryption = Get-WmiObject -Namespace root/cimv2/security/microsoftvolumeencryption -Class win32_encryptablevolume -Filter {DriveLetter = 'C:'} $Percent = ($encryption.GetConversionStatus()).EncryptionPercentage Write-Progress -activity "Decryption Progress" -PercentComplete $Percent -status "Decryption RProgress" }- A Registry change to override the encryption method
- Add the TPM Key Protector
- Add the Numerical Password Key Protector
- Encrypt C:
For v5 Releases: Now available in Builder
For v4 Releases: Fix Encryption Method.xml
Video Overview
Re-Enroll Agent
There are times when a Recast Agent attempts to connect to a Recast Management Server, but is unable. You'll see a warning in the Recast Management Server telling you that there is an Agent that is trying to connect, but it is not approved. This occurs most often if you delete the Agent from the Recast Management Server manually. Because the Agent information is deleted, there is no way to approve this Agent.
To resolve the problem, use this Builder action to re-enroll the Recast Agent.
The tool completes the following steps:
- Deletes the agent.sqlite file located in this folder:
Version 5.x Recast Agent: C:\ProgramData\Recast Software\Recast Agent
Version 4.x Recast Agent: C:\Windows\System32\config\systemprofile\AppData\Roaming\Recast Software\Recast Agent
- Restarts the Recast Agent service
For v5 Releases: Now available in Builder
For v4 Releases: Re-Enroll Agent.xml
Grant Remote Access
This Builder action is used to grant a specific AD user remote access to a device by adding the user to the local "Remote Desktop Users" group on the device.
The tool completes the following steps:
- Asks for the AD Username
- Adds the AD Username entered to the "Remote Desktop Users" local group.
For v5 Releases: Now available in Builder, Grant Remote Access 5.xml
For instructions on setting up this template in Builder, see Configure Recast Builder Actions.
As of Recast Software Version 5.1.2305.507, pre-built Recast templates can be accessed from within Recast Builder, eliminating the need to import them from the Recast Builder Actions page. These templates appear upon upgrade or with a fresh install for deployments that do not already have existing Builder templates in place.
For a description of the actions included in each pre-built template, see Recast Builder Actions.
For more information on configuring properties, parameters, and conditions, see the Recast Builder Overview.
You'll find pre-built Recast actions listed in the My Right Click Tools panel. Drag-and-drop them on to the canvas to view the sequence of included steps and edit their properties and parameters.
Some pre-built templates require a bit of configuration in Recast Builder before they can be run.
User Account Retire Protocol
For this Recast action, the Start Node represents the user account selected in Configuration Manager before running the action. The edges (aka the arrows) are preconfigured to link the Start Node to the Reset Password, Disable Account and Move Account to Container actions.
To configure the action:
1. Select the Start Node on the canvas.
Under Action Properties, view or edit the default settings and name the tool:
- View: Tabbed Results
- Name: For example, User Account Retire Protocol
- Display: User Name
- Action Type: User
Under Custom Input Parameters, view or edit the default settings:
- Display Name: Input a New Password
- Variable Name: TextBoxValue
- Minimum Length: 1
- Maximum Length: 20
2. Select the edge linking the Disable Account and Move Account to Container actions.
Under Target Input Parameters, update the ADPath as a Constant value.
ADPath Format Example: ADPath=RecastUsers,DC=demo,DC=recastsoftware,DC=com
NOTE: The ADPath is case sensitive.
Video Overview
Grant Remote Access
To configure the action:
1. Select the Start Node on the canvas.
Under Action Properties, view or edit the default settings:
- View: Two Grid Results
- Name: For example, Grant Remote Access
- Display: Computer Name
- Action Type: Device with Resource ID
2. Select the edge linking the Start Node and Add Local Group Member actions.
3. Under Target Input Parameters, update the User Domain as a Constant value.
Video Overview
Add an AD User to an AD Group
To configure the action:
1. Select the Start Node on the canvas.
Under Action Properties, view or edit the default settings:
- View: Tabbed Results
- Name: For example, Add To Group
- Display: User Name
- Action Type: User with Resource ID
Under Custom Input Parameters, add any AD Groups beyond the Finance, Marketing and Remote Desktop default groups.
Video Overview
A list of all the actions available from the Recast Actions panel in the Builder interface.
Plugin | Action |
|---|---|
| Active Directory | Add Account to Group Delete Account Disable Account Enable Account Get Account Group Membership: Returns all groups for an AD account. Get AD Computer Get AD Computers: Returns all devices for an AD domain. Get AD Computers BitLocker Status Get AD Computers in Group: Returns all nested devices in an AD group. Get AD Computer with LAPS Data Get AD Container by Distinguished Name Get AD Container by Object Guid Get AD Container by Object Guide Core Get AD Groups: Returns all groups for an AD domain. Get AD Groups in Group Get AD OUs Get AD User Get AD Users: Returns all users for an AD domain. Get Ad Users in Group Get BitLocker Recovery Data Get Domain Get Group Members Get Group Memberships: Returns all groups for the user or device from AD, including nested groups. Get Parent OUs: Returns all parent Organizational Units. Get Primary Group for Account Is Account Enabled Move Account to Container Remove Account from Group Reset Password Search AD Computers Search AD Groups Search AD Users Search OUs Search Principal Set LAPS Password Expiration Unlock Account |
| Administration | Add Permission to Role Add Role Add User Add User to Role Change Enrollment Settings Change Setting Delete Role Delete Route Delete User Get Admin Trend List Get All Permissions Get All Settings: Returns all names and current values listed on the RMS Settings page. Get Enrollment Settings Get Execution History: Returns audit log information. Get Permissions Details for User Get Permissions for Role Get Permissions for User Get Roles: Returns all user roles in RMS. Get Roles for User Get Trend Get Trend List Get Trends by Type Get User and Roles Get Users: Returns all users in RMS. Remove Permission from Role Remove User from Role Rename Role |
| Azure Active Directory (Entra ID) | Get Device Group Memberships Get Domain Get Group Memberships: Returns all groups for the user or device from Graph API, including nested groups. Search Principal Test New Service Connection Test Service Connection |
| BitLocker | Add Numerical Password Key Protector Add Passphrase Key Protector And Protectors and Encrypt Add TPM and PIN Key Protector Add TPM and Startup Key Key Protector Add TPM Key Protector Backup Key Protector to Active Directory Backup Key Protector to Azure Active Directory Decrypt Volume Encrypt Volume |
| Builder Action | Concatenate Strings List Actions List Actions in Category List Actions with Type Run Saved Action: Runs a Builder Action and returns results. Sleep Start Node |
| ConfigMgr Client | Advanced Client Information Application Deployment Evaluation Cycle: Initiates this cycle on a ConfigMgr client. Boundaries Boundary Groups Change Cache Size Clear Cache: Deletes all content in the ConfigMgr client cache. Client Cache General Information: Returns a summary of client cache information. Client Cache Content: Returns all content details in the cache. Execution History Installed Client Components Deployed Applications: Returns all ConfigMgr-deployed applications from the client. Deployments: Returns all ConfigMgr programs and task sequence deployments from the client. Discovery Data Collection Cycle: Initiates this cycle on a ConfigMgr client. Evaluate Configuration Baseline File Collection Cycle General Client Information: Returns ConfigMgr client information Get Boundary Information Get Client Information Cache Data: Returns cache usage summary for a ConfigMgr client. Get Configuration Baselines: Returns all deployed ConfigMgr baselines from a client. Get Deployed Programs: Returns all ConfigMgr-deployed programs from the client. Get Deployed Task Sequences: Returns all ConfigMgr task sequences deployed to a device. Get Device ID Get Service Windows Get User Policy Endpoint Hardware Inventory Cycle: Initiates this cycle on a ConfigMgr client. Install Application Install Application or Program: Initiates installation of a ConfigMgr application or program on a device. Install Program Install Software Updates Install Software Updates by ID Install User Application Machine Policy Retrieval and Evaluation Cycle: Initiates this cycle on a ConfigMgr client. Missing Software Updates: Returns all missing software updates currently deployed to a device. Package Information Refresh Updates Compliance State Remove Items from Cache Repair Client: Initiates ConfigMgr client repair process. Rerun Deployment: Initiates deployment execution of task sequences or package programs on the ConfigMgr client. Restart SMS Agent Run Client Check Run Client Action Send ConfigMgr Client Toast Notification Send Unsent State Messages: Sends pending state message for a ConfigMgr client. Software Inventory Cycle: Initiates this cycle on a ConfigMgr client. Software Metering Usage Report Cycle Software Updates Deployment Evaluation Cycle: Initiates this cycle on a ConfigMgr client. Software Updates Scan Cycle |
| ConfigMgr Server | Add Computer Names to Collection Add Device Resource ID to Collection Add Content to Distribution Point Add Content to Distribution Point Group Add Devices to Collection: Adds devices to a collection, based on a specific or wildcard search of computer names. Add Devices to Collection by Resource ID Add Item to Scope Add User Resource ID to Collection Add Users to Collection Approve or Deny Request Content Details: Returns content information and summary for distribution points. Create Query Delete Device Delete Devices Delete User Get Accounts Get Active Alerts Get Active Directory Forests Get Administrative Users Get Alert Subscriptions Get All Alerts Get All Collections Get All Content Status Get All Deployment Types: Returns all application deployment types in ConfigMgr. Get All Device Collections Get All Device Collections by Collections Get All Devices Get All Devices in OU Get All Distributed Content: Returns all distributed content in ConfigMgr. Get All Software Updates Get All User Collections Get All Users Get Application by ID Get Application Revisions Get Applications Get Approval Requests Get Asset Intelligence Catalog Get Asset Intelligence Hardware Requirements Get Asset Intelligence Inventoried Software Get Automatic Deployment Rules Get Baseboard Information Get Boot Images Get Boundaries Get Boundary Groups Get Category Instance by ID Get Certificates Get Chassis Information Get Client Operations Get Client Settings Get Collection Folder Information Get Collections for Device Get Collections for User Get Collection Variables for Device Get Comanaged Device Workloads by Collection: Given a Collection ID, returns devices and workloads comanaged in ConfigMgr and Intune. Get Comanaged Workloads: Given a Resource ID, the action returns workloads that are being comanaged in Configuration Manager and Intune. Get Compliant Update Statuses Get Component Status Get Computers Without LAPS Client: Returns all devices without a legacy Microsoft LAPS client. Get Computers with x64 LAPS Client: Returns all devices with a 64-bit legacy Microsoft LAPS client. Get Computers with x86 LAPS Client: Returns all devices with a 32-bit legacy Microsoft LAPS client. Get Computer System Information Get Computer Warranty Get Configuration Baselines Get Configuration Items Get Conflicting Records Get Content Status: Returns content information and summary of distribution status. Get Deployed Applications for User Get Deployment Packages Get Deployments Get Deployment Types for Application Get Device Collection Folders Get Device Collection Information for Device: Returns information about all collections for a device. Get Device Collection Members: Returns all devices in a collection. Get Device Collections in Folder Get Device Count Get Devices by Creation Date Get Devices by MAC Address Get Devices by BIOS GUID Get Devices by ME ID: Given one or more Microsoft Entra ID GUIDs, a Site Code and a SMS Provider, returns the domain name for a device from ConfigMgr. Get Discovery Methods Get Distributed Software Updates: Returns all software updates distributed in a ConfigMgr site. Get Distribution Point Configuration Status Get Distribution Point Content Get Distribution Point Groups Get Distribution Point Group Status Get Distribution Point Group Status for Package: Returns all distribution point groups for a piece of content. Get Distribution Points in Distribution Point Group Get Distribution Point Status for Package: Returns all distribution points for a piece of content. Get Distribution Point Groups with Members Get Distribution Point Group Task Sequence Content Get Driver Packages Get Drivers Get Endpoint Protection Antimalware Policies Get Endpoint Protection Firewall Policies Get Failed Content on Distribution Point Get Global Conditions Get Installed Software Updates Get Machines with ConfigMgr BitLocker Management Keys: Returns all devices with BitLocker keys in ConfigMgr. Get Malware Detected Get Manufacturer Counts Get Migration Jobs Get Non-Compliant Update Statuses Get Object Container Items Get Operating System Images Get Operating System Installers Get Packages Get Power Configurations for Computer Get Queries Get Recent Devices Scanned Get Required Software Updates Get Scope Memberships Get Security Roles Get Security Scopes Get Servers and Site System Roles Get Service Windows for Computer Get Sites Get Site Status: Returns all site systems statuses in ConfigMgr. Get Software Metering Rules Get Software Update Groups: Returns all software update groups in ConfigMgr. Get Software Updates in Group Get Status Message Queries Get System BIOS Information Get System Console Usage Data Get System Firmware Status Get System Operating System Information Get Systems BitLocker Encryption Status: Returns the BitLocker encryption status for devices in ConfigMgr. Get Task Sequence Content Get Task Sequences Get Unknown Devices Get User Collection Folders Get User Collection Members Get User Collections in Folder Get User Devices Get User Devices by User Name Get User State Migrations Get Virtual Hard Disks Get Warranty Information: Retrieves and updates warranty data in ConfigMgr for a collection of devices. Install Application Redistribute Content to Distribution Point: Initiates redistribution of content to a distribution point. Redistribute Content to Distribution Point Group Remove Content from Distribution Point: Initiates removal of content from a distribution point. Remove Content from Distribution Point Group Remove Devices from Collection Remove Devices from Collection by Resource ID Remove Item from Security Scope Remove Users from Collection Remove Users from Collection by Resource ID Run Client Operation Run Configuration Manager WQL Query Run ConfigMgr Script on Devices Run Recast Action: Runs a Recast Action on the Fast Channel and returns results. Run Status Message Query Run WQL Query Save Query Start CM Site Backup Update Content Validate Content on Distribution Point Group: Initiates ConfigMgr validation for content on a distribution point. Wake on LAN: Sends a Wake on LAN packet to a device. Wake on LAN Fast Channel |
| Send Email via SMTP | |
| Endpoint Insights | Open Recast Endpoint Insights Report Viewer |
| Filesystem | Append Text to File Copy File Copy Folder Create Folder Delete File Delete Folder Move File Move Folder Replace Text in File Set Owner on File Set Owner on Folder Write Text to File |
| Installed Software | List Software: Returns all software in Add/Remove Program on a device. Uninstall Software |
| Kiosk Manager | Applied Profile Status Apply Profile: Applies a Kiosk Manager profile to a device. List Profiles: Returns all saved Kiosk profiles. Prepare Profile Rollback Profile |
| MBAM | Get Machines with MBAM Keys Get Machines with MBAM Keys v2 Get MBAM Compliance Get MBAM Compliance for All Machines Get Recovery Keys for Device Get TPM Hash Get TPM Hash for User |
| Network | Ping Computer: Returns a response to an Internet Control Message Protocol (ICMP) echo request from a device. |
| PowerShell | Run PowerShell Script Block |
| Registry | Add Permission Create Subkey Delete Subkey Delete Value Get Value List Hives List Subkeys List Values Remove Permission Rename Value Set Owner Set Value |
| System Center Endpoint Protection | Add Defender Exclusion Full SCEP Scan Gather SCEP Logs Get Defender Exclusions Get Defender Status Start Defender Scan Update SCEP Definitions |
| Scheduler | Cancel Action |
| Services | Change Login Change Start Mode List Services: Returns all services on a device. Restart Service Start Service Stop Service |
| System Information | Add Local Group Member Cancel Shutdown Remove Local Group Member Delete Profile: Deletes a Windows user profile from a device. Get All Local Group Members Get Battery Information Get Drivers Get General Information: Returns hardware and operating system information for a device. Get Logged in Users: Returns all users currently logged into a device. Get Running Processes Get Updates: Returns all software updates installed on a device. Get User Profiles: Returns all user profile information on a device. Get User Sessions: Returns all users currently logged into a device. Group Policy Update: Initiates a group policy update on a device. Kill Process Log Off All Users Log Off User Session Reset BitLocker Recovery Password Schedule Shutdown Send Message to All Users Send Message to User Session Send Recast Toast Notification Shut Down Computer: Initiates shutdown and restart of a device. Shut Down Computer with Prompt System Information Collection |
| Task Scheduler | Delete Task Get Task Results Get Task Results for Date List Tasks Schedule Task Schedule Task Daily Schedule Task Monthly by Day Schedule Task Monthly by Occurrence Schedule Task Weekly Start Task by ID Start Task by Name |
| Unified Write Filter | Add File Exclusions Add Registry Exclusions Apply Profile Commit File Deletions Commit Files Commit Registry Deletion Commit Registry Values Configure Unified Write Filter Delete Profile Disable Bind by Drive Letter Disable Servicing Disable Unified Write Filter Enable Bind by Drive Letter Enable Servicing Enable Unified Write Filter Find File Exclusion List File Exclusions Get Overlay Configuration List Registry Exclusions Get Unified Write Filter Feature Status Get Unified Write Filter Status Install Unified Write Filter List Profiles Protect All Volumes Protect Volume Remove All File Exclusions Remove All Registry Exclusions Remove File Exclusions Remove Registry Exclusions Remove Unified Write Filter Reset Unified Write Filter Settings Restart System Save Profile Set Maximum Overlay Size Set Overlay Critical Threshold Set Overlay Type Set Overlay Warning Threshold Shut Down System Unprotect Volume Update Windows Use Disk Overlay Use RAM Overlay Volume is Protected |
| Windows Security | Clear TPM Enable Credential Guard Settings Enable System Guard Secure Launch Enable TPM Auto Provisioning Enable Virtualization Based Security Get All Virtualization Based Security Settings Get TPM Status Get UEFI Secure Boot Status Get Virtualization Based Security Settings Get Windows Firewall Profiles Get Windows Firewall Rules Provision TPM |
| Windows Task Scheduler | Delete Task List Tasks Run Task Schedule Task |
| Windows Update Agent | Get Updates: Returns missing software updates for a given computer. Download and Install Updates: Downloads and installs all missing software updates on a comanaged device. Download and Install Select Updates: Downloads and installs selected missing software updates on a comanaged device. |
| Windows Management Instrumentation (WMI) | List Classes List Class Methods List Instance Methods List Instances List Namespaces Run Class Method Run Instance Method Run WQL Query |
Recast Runner executes actions created with Recast Builder. Builder actions can only be run with the user account accessing the Configuration Manager console or by routing over the Recast Proxy service account.
To execute a Builder Action with Recast Runner:
1. Right-click in your Configuration Manager console and select Recast Automation > Recast Runner.
2. In the RCT Runner - Run Action dialog, select an action and click Next.
3. Choose to run the action immediately or according to a schedule and click Finish.